

It’s been about 4 years since we moved into our house and I started having a shop. It’s funny how what you grow up with is normal to you. I grew up with my dad’s 2 car garage wood shop full of every tool imaginable. I think I remember about 2 times that there was ever a car in the garage. My wife however grew up with her parents putting both their cars in the garage every single day of the year. So here we are with a compromise. Her car gets to live in the garage during the winter (or really anytime there is snow or going to be snow). and I get to have a workshop in the garage the rest of the year.

Fortunately we do have a basement and a shed, so that removes a lot of the yard tools, lawn mower, and other storage items that usually take up space in a garage. So when we need to get a car in the garage it is basically the shop taking up the rest of the space.
So the car moves to the drive way and the table saw gets moved from the back wall into the middle of the garage. Then of course there is some stuff that gets piled up on horizontal surfaces that needs to be moved out of the way and then it is ready to do some woodworking.
When we bought our house my father in law asked if I had any interest in some things in his basement. His father in law had made some friends while visiting his father in law in a nursing home who was a Swedish carpenter Mr. Anderson. Since Mr. Anderson’s family was in Sweden when he passed away his tools were made there way to my father in law’s basement.
So right off the bat I got a jump start on a workshop by getting a workbench, table saw, and some hand planes and hand saws. That combined with the normal screw drivers and drills that I already had from being a homeowner gave me a good jump start on building a shop.
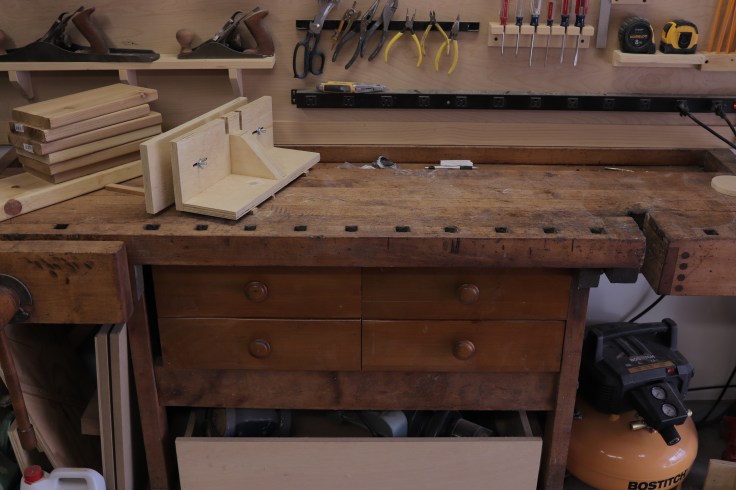
The workbench is a traditional style woodworking bench made from solid maple with a front and end vice. I had to remake a piece that was broken to get the end vice working again. And in what felt like sacrilege I had to take a hand plane to the top to get it flat again, but after a quick sand to get the paint splatters off and a once over with some tung oil the bench looks great with still plenty of character, and more importantly works great too.
I went ahead and built some drawers for under the top from a dresser that the neighbors threw in the garbage. Top left is all my measuring and marking tools. Top right is chisels. Bottom left is coping saw blades, bench dogs and some other stuff. And bottom right is files, sanding stones, and other sharpening paraphernalia. These drawers combined with the tool wall above the bench put most tools, especially hand tools within quick reach.

Note the plethora of pencils on the wall. I have found that it only takes a couple of seconds into a project for every pencil to wander off never to be seen again. Since it can be frustrating to constantly be looking for the pencil you just put down my plan has been to flood every available place in the shop with as many pencils as possible. If there are a hundred in the shop then when you lose the one you just put down there is another one close by to pick up.
A tool wall is a nice addition to any small shop. It was nice to fill up the wall with tools and not have to keep them in 2 big saw tool boxes that took up a bunch of space in the garage. Some would argue that rust would be a concern with having things out in the shop, especially since I do pull a car in the garage in the winter, but the only trouble I have had with rust is on horizontal surfaces like the band saw and table saw tops.

In the back corner sits my band saw. It is a Rockwell Delta 10″ band saw that I picked up at a garage sale for less money than the new blade I bought for it. It works well in that position for small curvy cutting which is what I mainly use it for, however if I need more room it is easy enough to roll it out and cut what I need to. I built the stand that it sits so that the band saw is the right height. Underneath there are 5 drawers. The top holds all my screws. the second drawer is bolts and other miscellaneous hardware. The third drawer holds some specialty clamps like a band clamp and some corner clamps. The fourth drawer is various electrical supplies like outlet boxes, switches, a stud finder. And finally the bottom drawer is all reclaimed hardware like hinges, casters, latches, and handles.
Help Support This Content!
The back wall of the shop holds various things up on a french cleat. I think that using a french cleat for a tool wall is not the best solution. For tiny things the cleats take up too much space and fall off easily when they are little holders for things like screw drivers and tape measures. However on medium to big things that you want to hand on the wall the french cleat is the best option. I installed a couple of rows of french cleats on the back wall when setting up the shop and my one regret is not adding more rows. Over time I have built a clamp rack, a box to hold my drills and chargers, and a tower to organize all the sandpaper in the shop. Even the cabinet on the left of the wall is just held up by the cleats. These things are heavy enough to stay in place and not move on me, but it is easy enough to shift them around when I need to.
Tucked away in the corner of my shop is the dust collector. This is a harbor freight 1hp dust collector that I hung on the back wall with the same french cleat. It is connected to a 30 gallon fiber barrel that has 2 90 degree elbows to deflect most of the dust and bigger chunks into the barrel before getting to the impeller. It isn’t really plumbed into anything so I just have one long hose coming off of it that I attach to the sander and the table saw. Otherwise I just use it to clean up the shop and for other hand held tools I just use a shop vac.
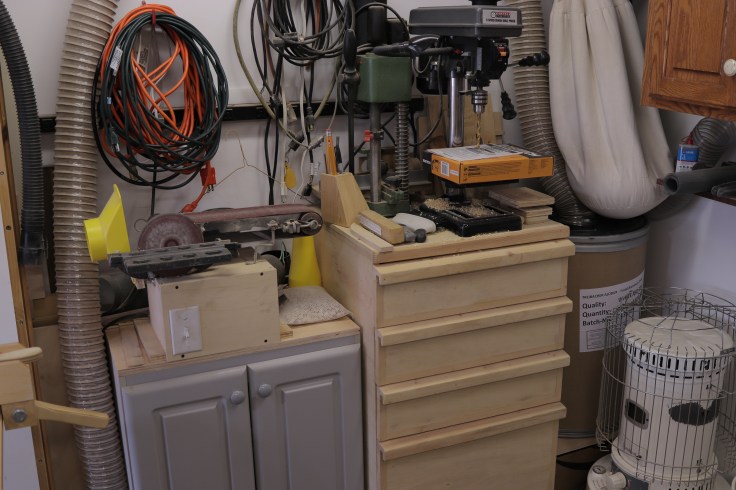
Next to that is a stand that I made to hold the drill press and a mortising machine that I got from my father. my intent was to build the cabinet so that I could lift the top and flip it around to use either the drill press or the mortising machine, but since I have built it I have never done that. Truthfully I either don’t use the mortising machine at all, or I need to cut a bunch of mortises at once so I bring it out and set it up on the workbench.
Below the drill press are 4 drawers, the top holds all my drill bits, the second is my nail guns and nails. The third is various sockets, wrenches, and other tools that mainly get used on my car, and then the bottom drawer is bigger and holds most of my hand held power tools like a grinder, belt sander, router, and jigsaw.
To the left of the drill press cabinet is another estate sale find. It is an old mystery belt and disc sander. It just came with the cast iron piece and a motor and I had to build the enclosure and wire the switch to get it up and running. The tracking on it is pretty terrible and adjusting it is even worse so the belt drifts a lot and it is slowly sanding itself apart. However the price was right and it works for now.
Beneath the sander is a cabinet that holds more car related tools like a oil pan and box of parts.
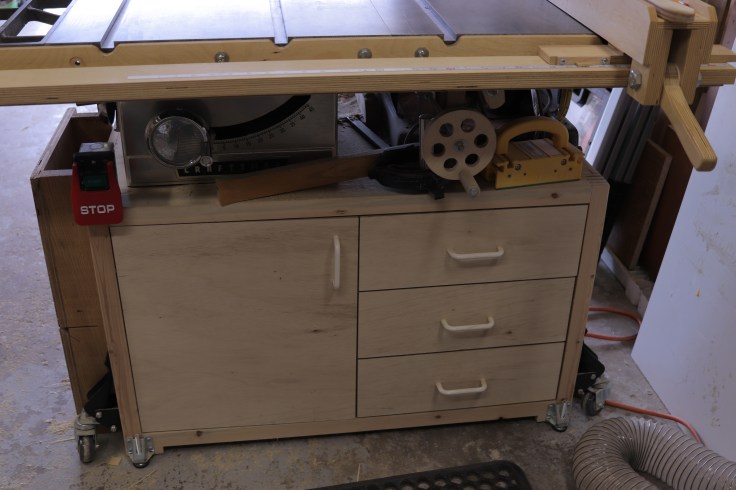
The middle of the shop is taken up by my table saw. This is an old Craftsman 113.29901 style saw that came via my father in law from Mr. Anderson. It is a 10″ contractor saw that has a one horsepower motor. These saws are kind of a pain to adjust and the fence that comes with them is terrible but once you get the blade parallel to the miter slots I can’t complain. When I got the saw it had no extension wings so the rip capacity was around 10 inches. Not great. In looking for extension wings it was actually cheaper for me to buy a second table saw then just the wings by themselves. So with a second saw I decided to use both solid cast iron tops and take the saw out of the one table to install a router lift.
I built a new fence for the saw from John Heisz’ plans and also built his router lift. I put the “new” saw on a stand I built and put some drawers and a cabinet below to hold all of the router and table saw accessories.
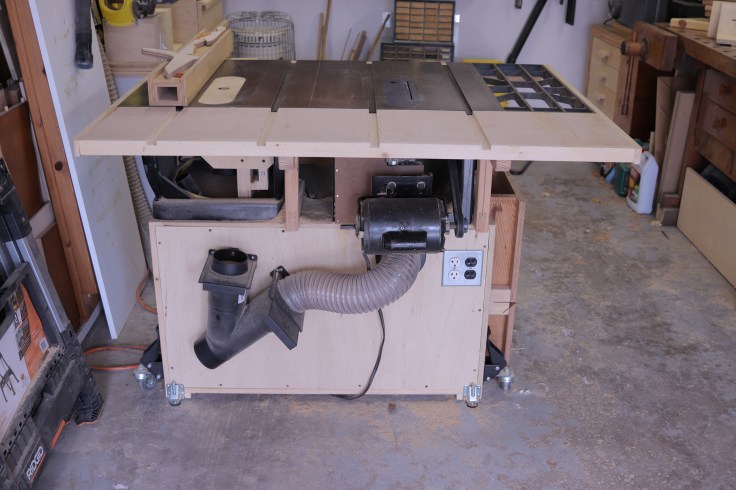
The last addition to the saw was to add a 12 inch extension table out the back of the saw. This not only helps support longer pieces when ripping them through the saw, but protects the motor and belt from anything falling on top of them. You can see on the back of the saw the plumbing for the dust collection for the table saw. As well as the fitting that will be used for the router table whenever I get around to finishing that.
There is plenty more that I could cover but I don’t know if you would find it interesting and I think that this article is long enough already. If you would like to see a tour of the shop then check out the video below.

Leave a comment