


Seems like piano conversions are some kind of mythical creature. I have seen them many times in music videos and live shows but information on doing the actual conversion is pretty slim. This is my take on the project of gutting an upright piano and installing an electric keyboard.
Obviously step one is to figure out what exactly you are trying to accomplish in the end. The plan for this piano is to live on stage at church and be the main jack of all trades piano for our worship services and other events. With that in mind I wanted to work with the extremes of sit down with some sheet music, flip a switch and make noise all the way to full on Mainstage MIDI keyboard make any sounds you could think of keyboard. Once I had a plan for what I wanted the piano to do I set out on finding the biggest piece, the donor piano.
With some patience and a little luck I found a nice walnut veneer spinet piano on Craigslist for free. The piano itself was pretty rough and would’ve needed a lot of work to really work well, but luckily for this project that doesn’t matter at all. All that matters in the end is that the outside of the piano looks the way you want.
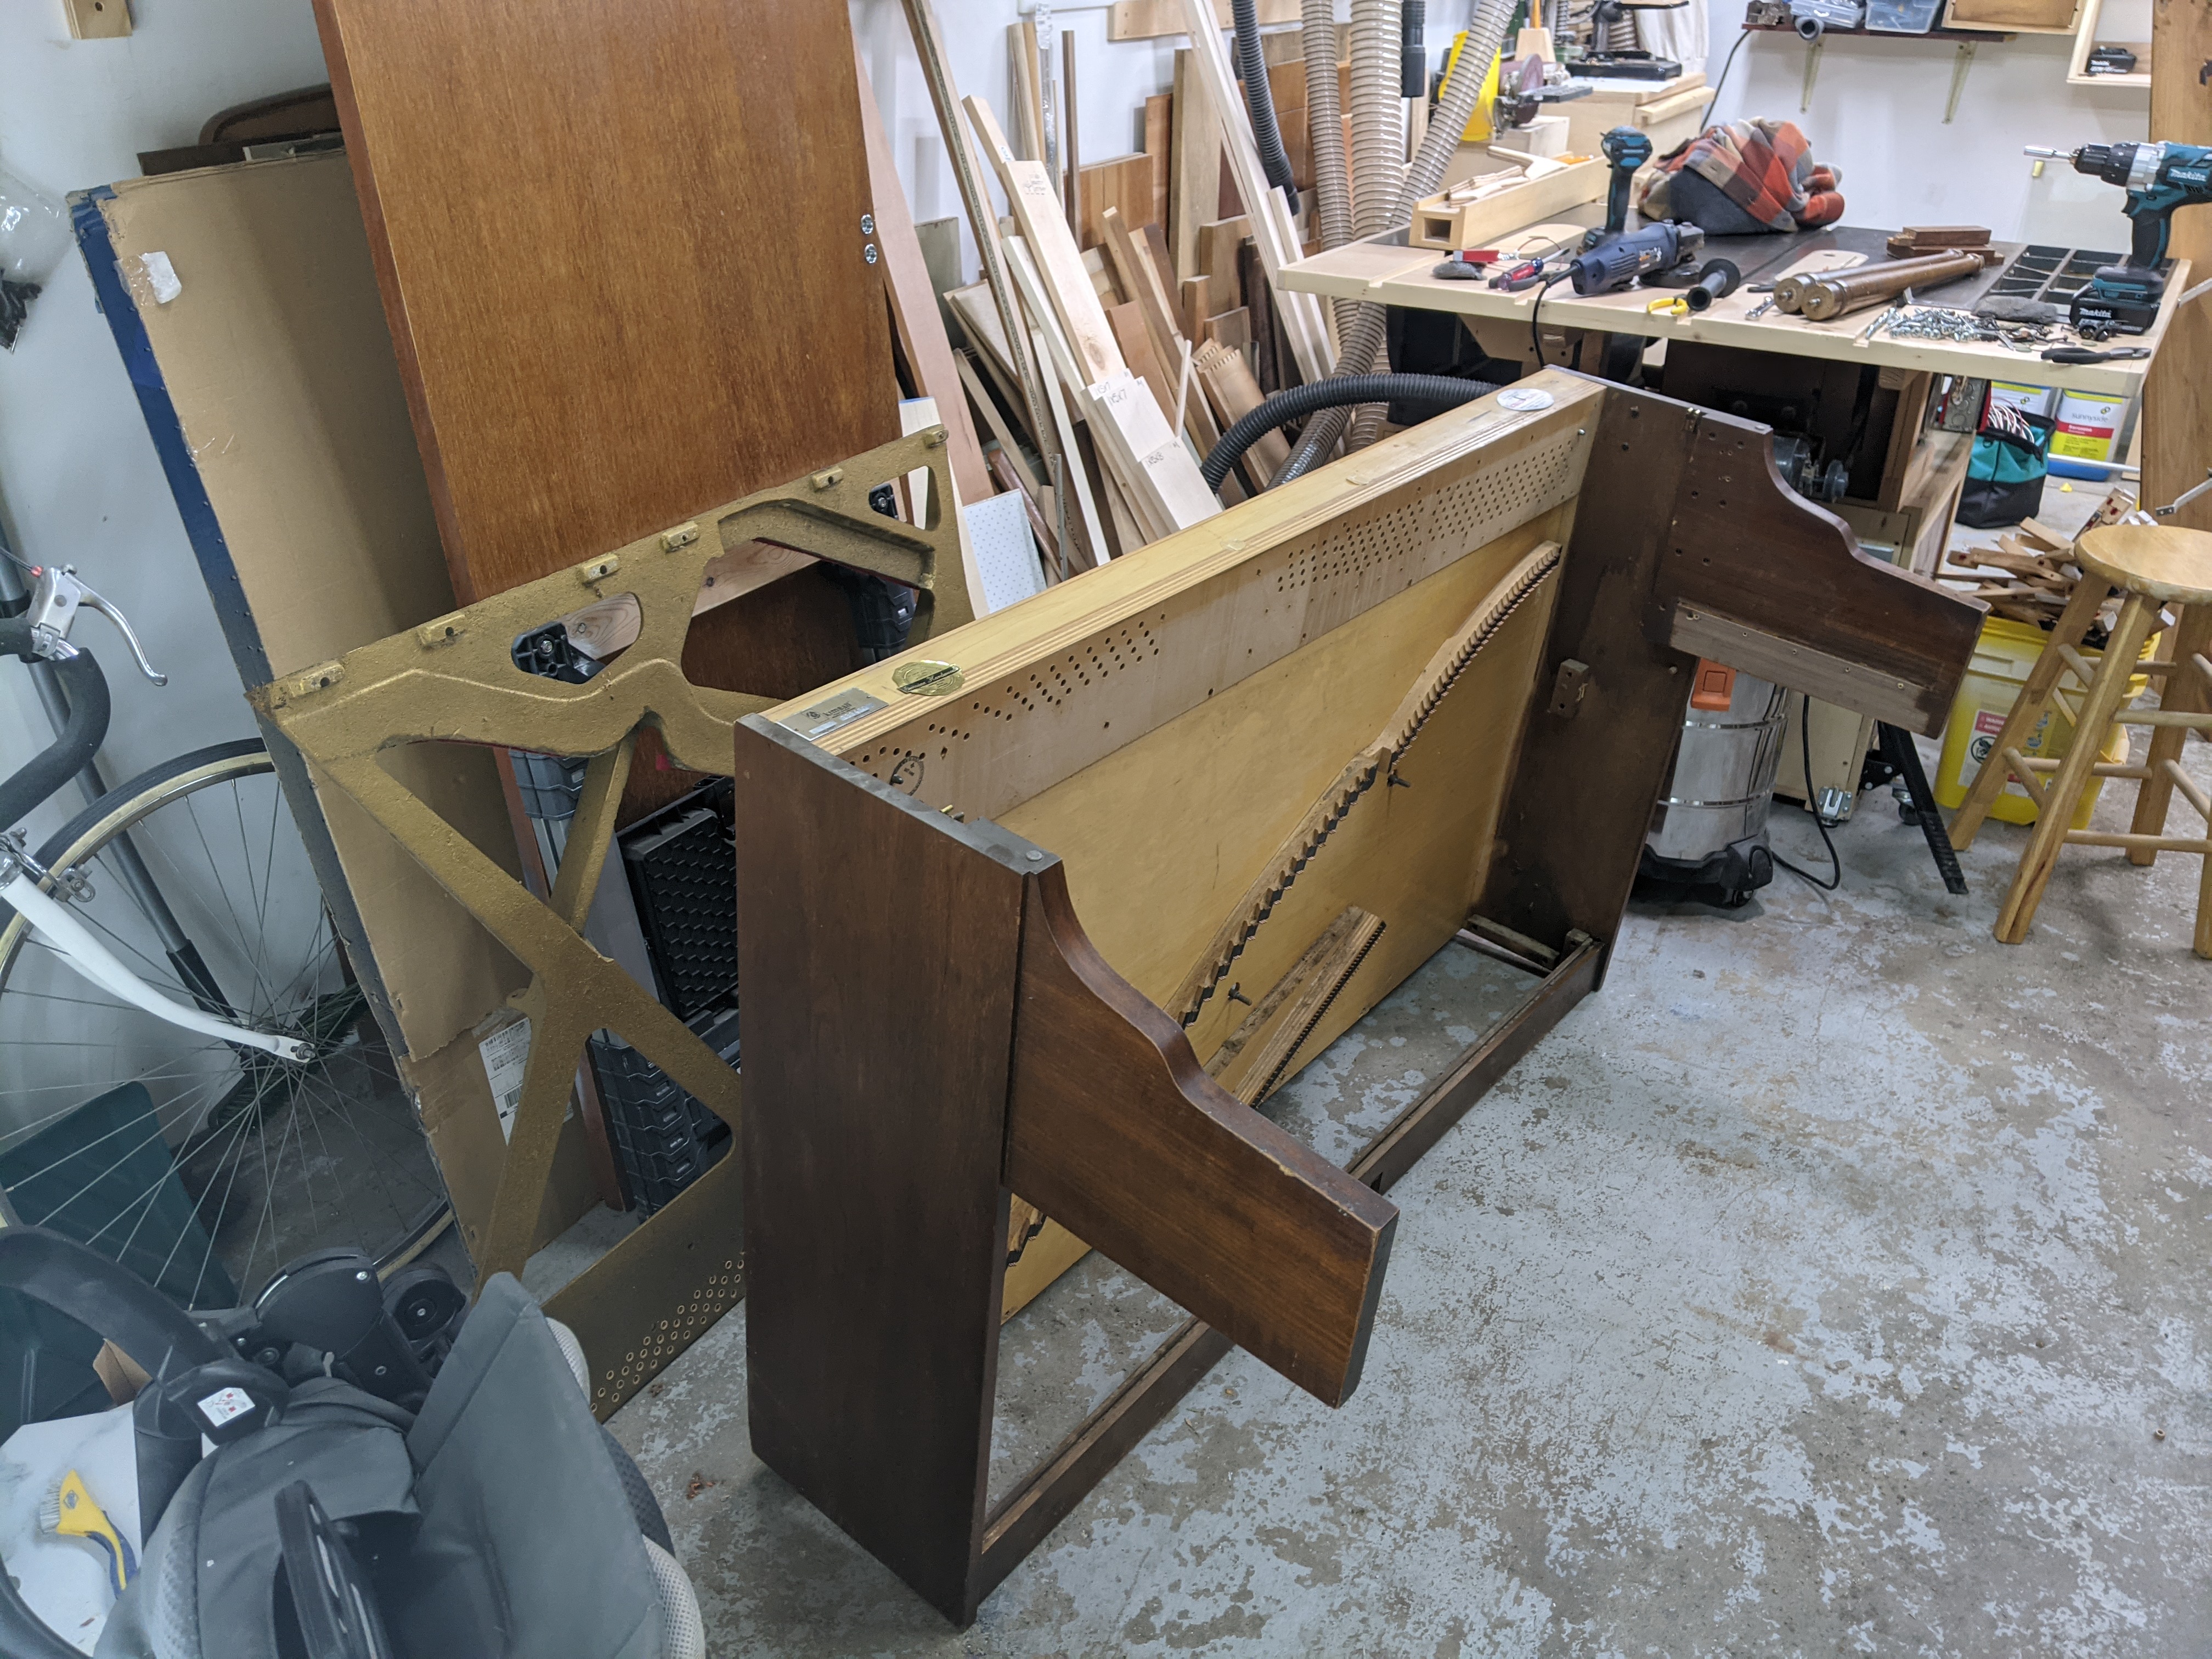
Got the piano into the workshop and then the disassembly could begin. Most of the pieces come off real easy and straightforward with basically just a Phillips screwdriver and some lifting. You could just remove the keys and hammer assembly and you would have room enough to put a MIDI controller in and be done, however probably about half of the weight of the piano is the strings, tuning pegs, and metal bracing called the harp.
Help Support This Content!
The first thing you want to do is remove all the tension on the piano from the strings. The tension on the harp of a piano is somewhere in the ball park of 20 tons. I did this probably the quickest and most barbaric way possible simply by taking an angle grinder to all the strings. Obviously you should wear eye and ear protection when doing this. The next step is to remove all the tuning pegs from the top of the frame. You could do this with a piano tuning wrench but then you might be doing it for the rest of your life. I strongly recommend picking up a tuning peg socket for your electric drill.
Once the strings are cut and the tuning pegs are removed then you can remove all the screws and bolts holding the harp inside the piano and lift it out. I say that like it’s nothing here but it is a big heavy bear to remove. I managed to scoot it out a little bit at a time with some blocks but I don’t necessary recommend that. With the old piano keys, hammers and dampers, and strings and harp removed the piano is definitely light enough for two people to lift and move around.


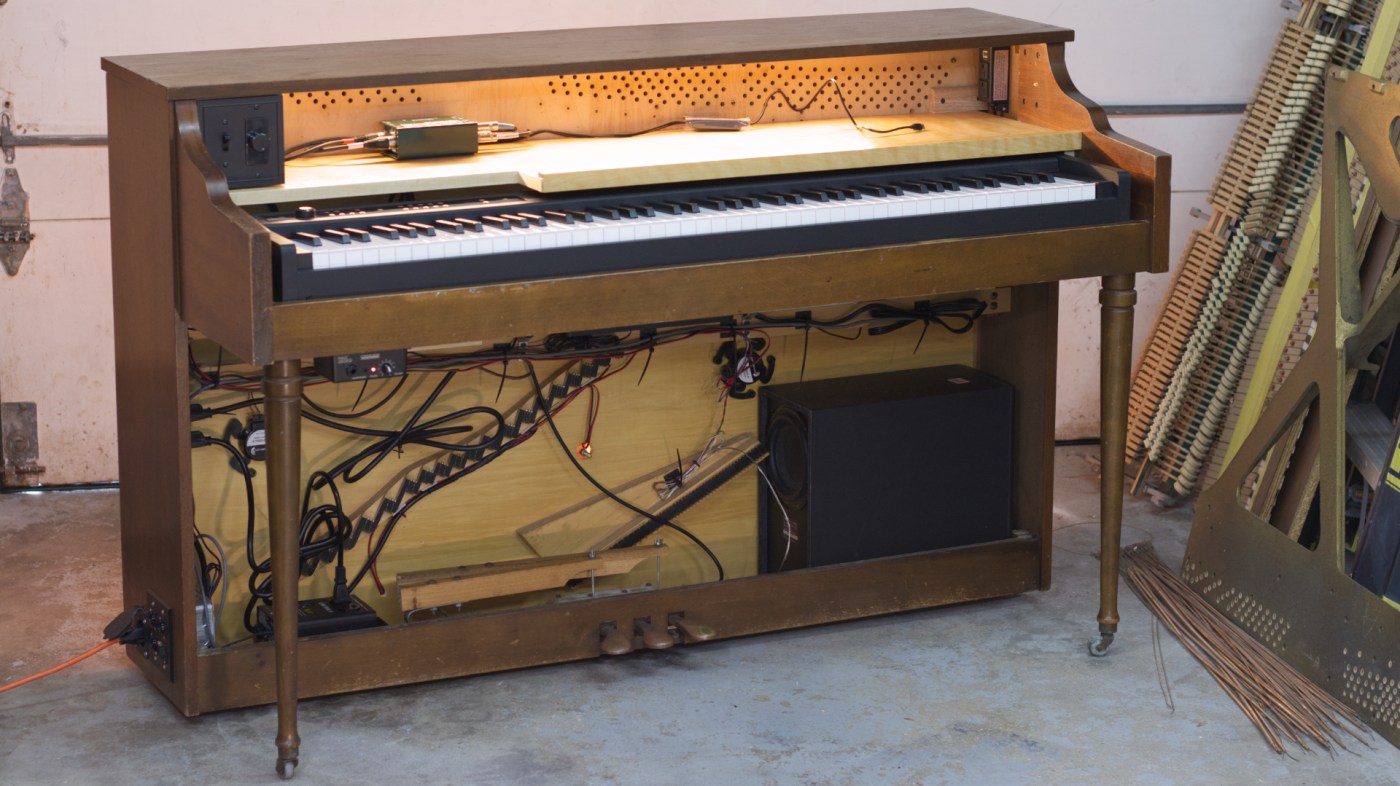
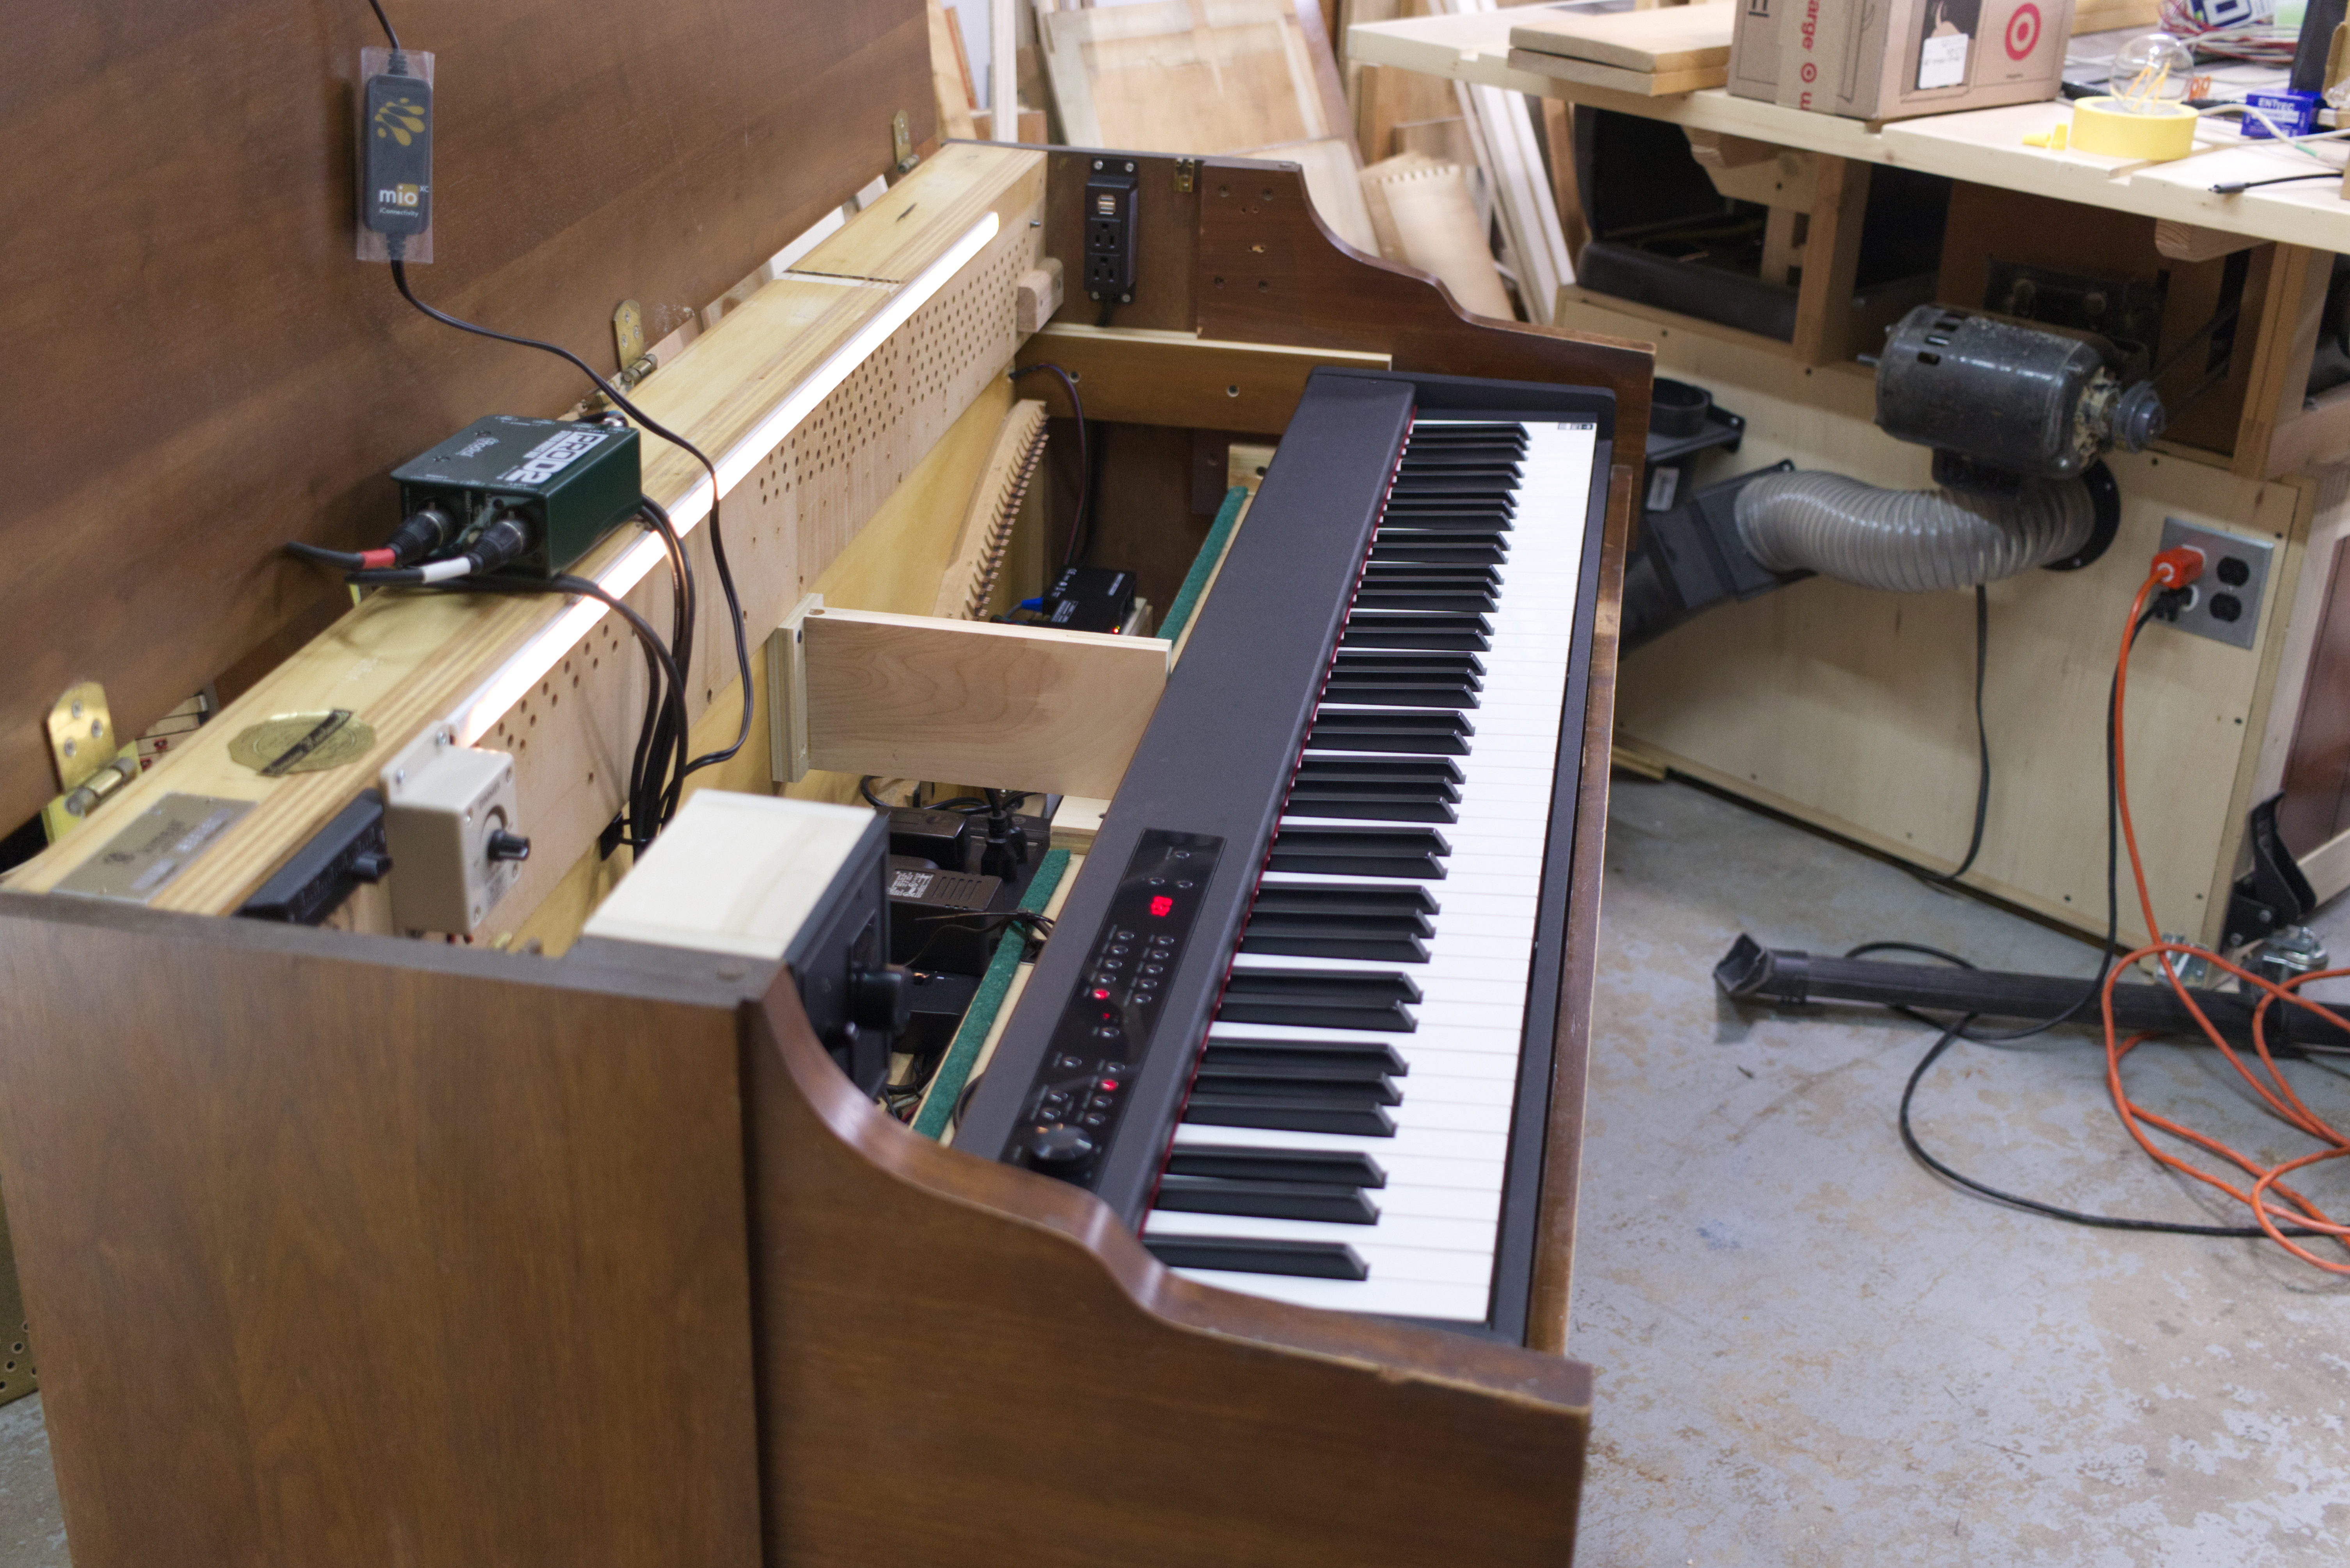
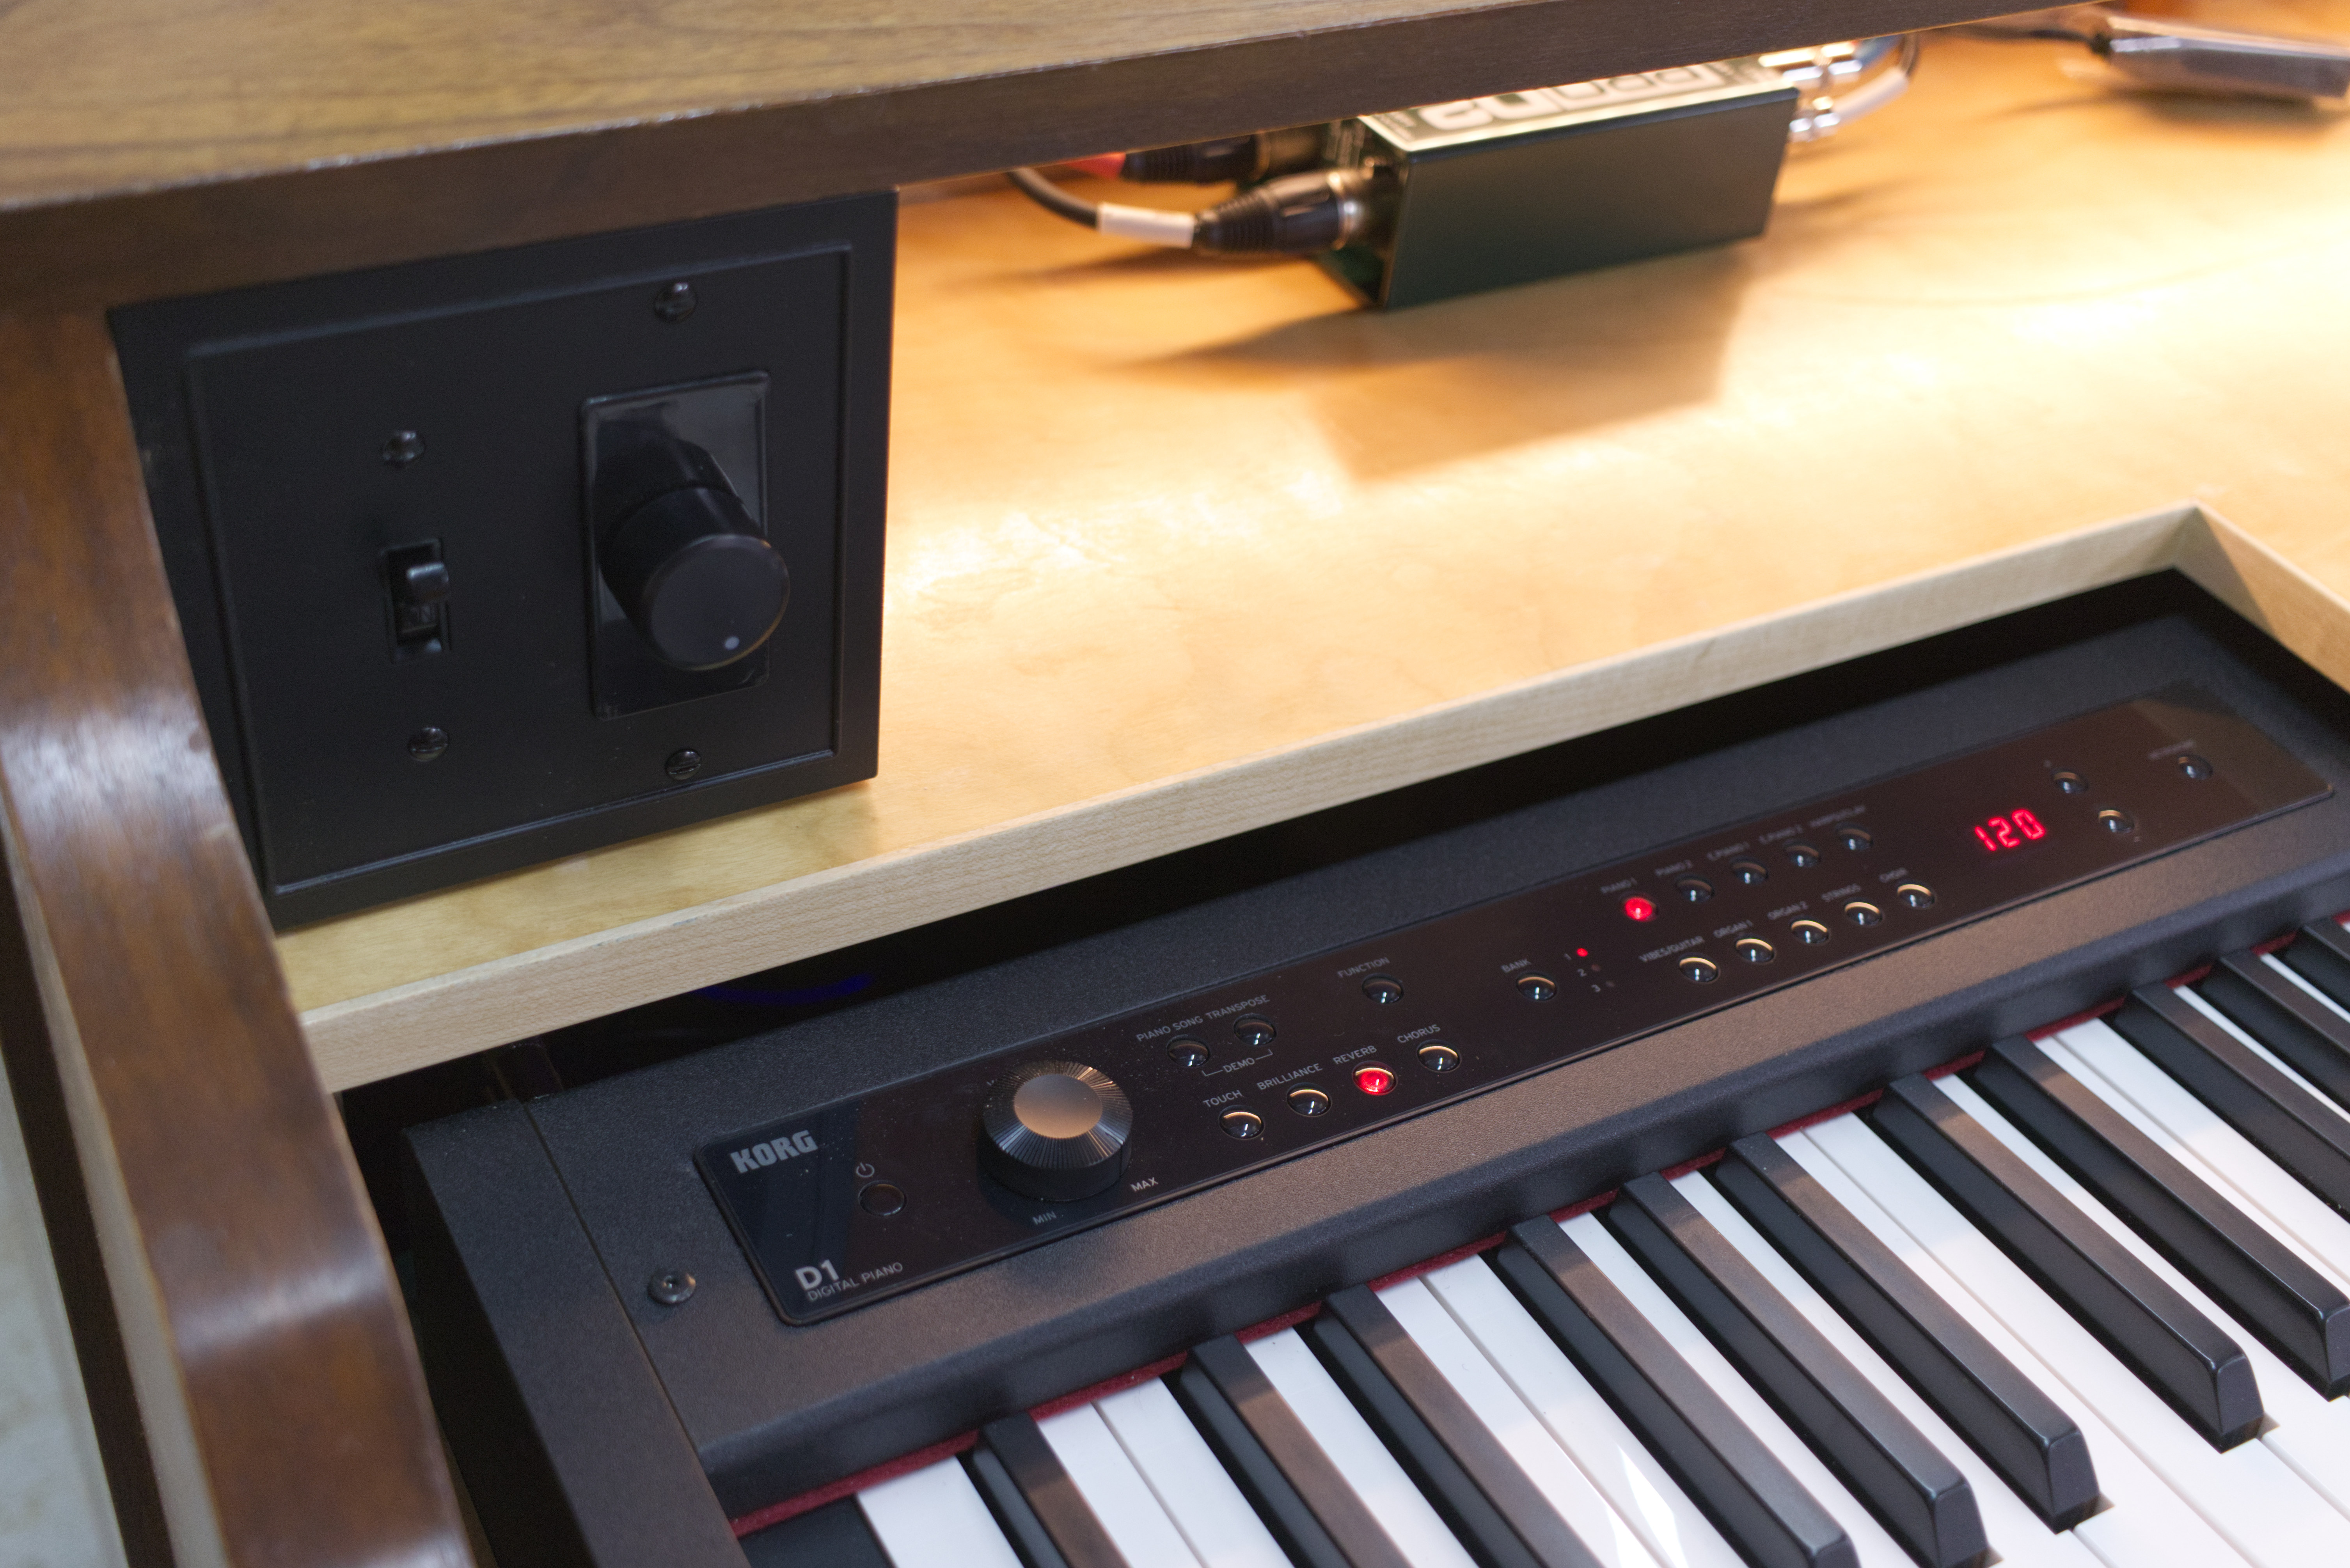
Now that the piano is a blank slate we can start to install the keyboard and other components to build out the electric piano. I chose to go to with the Korg D1 keyboard. My criteria for a keyboard was to have 88 full weighted keys, have it’s own audio output for simple piano sounds, and fit inside the piano case. I found that a lot of 88 key keyboards that have the pitch wheel and modulation on the side are too long to fit inside a spinet piano case so that is something to consider if you decide to make your own.

Even with the considerations of the keyboard I still had to trim the keyboard shelf cleats so that the keyboard fit. Once the shelf supports were trimmed and the keyboard dropped in then I could work on an inner shelf for various things like extra MIDI controllers, DI boxes, audio interfaces and whatever else. This was pretty straightforward as I just cut some cleats and attached them to the the inside side walls of the piano case to support the shelf above the keyboard. That shelf and supports for it are really the only part of the project that is woodworking. There is some hole cutting but besides that most of the project is wiring.
The wiring for this project is broken down into three main categories: power, audio, and DMX lighting.

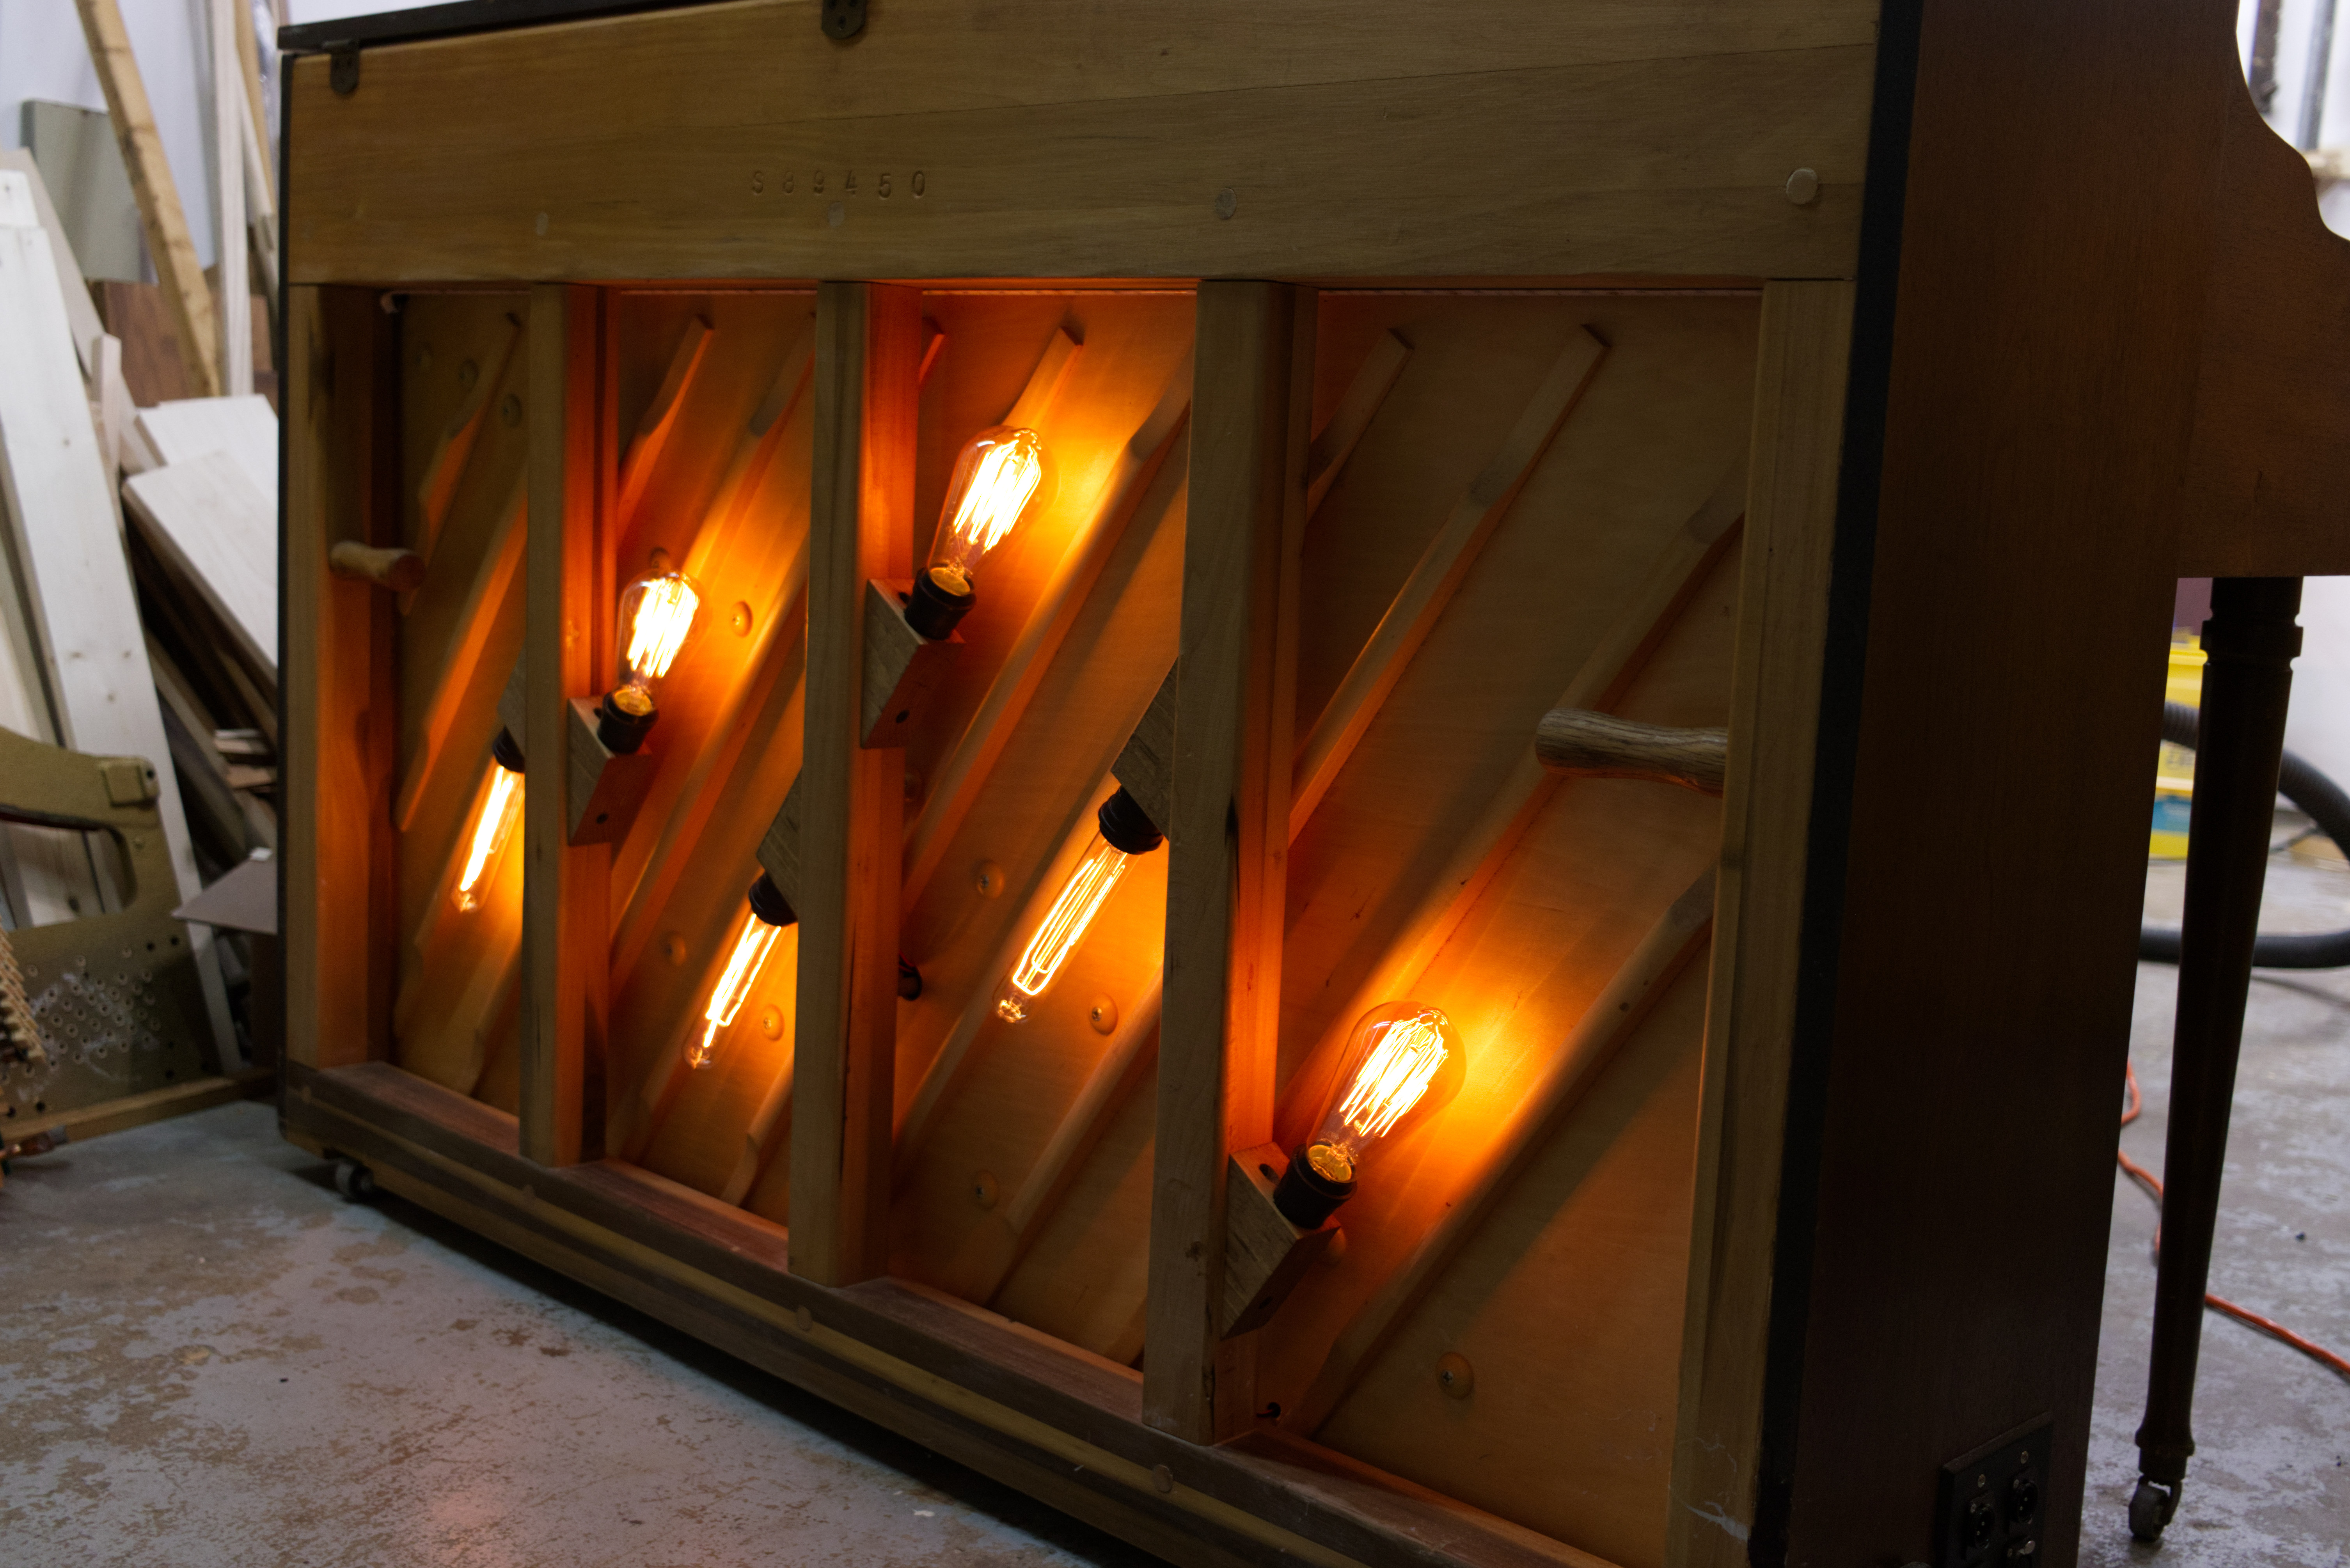
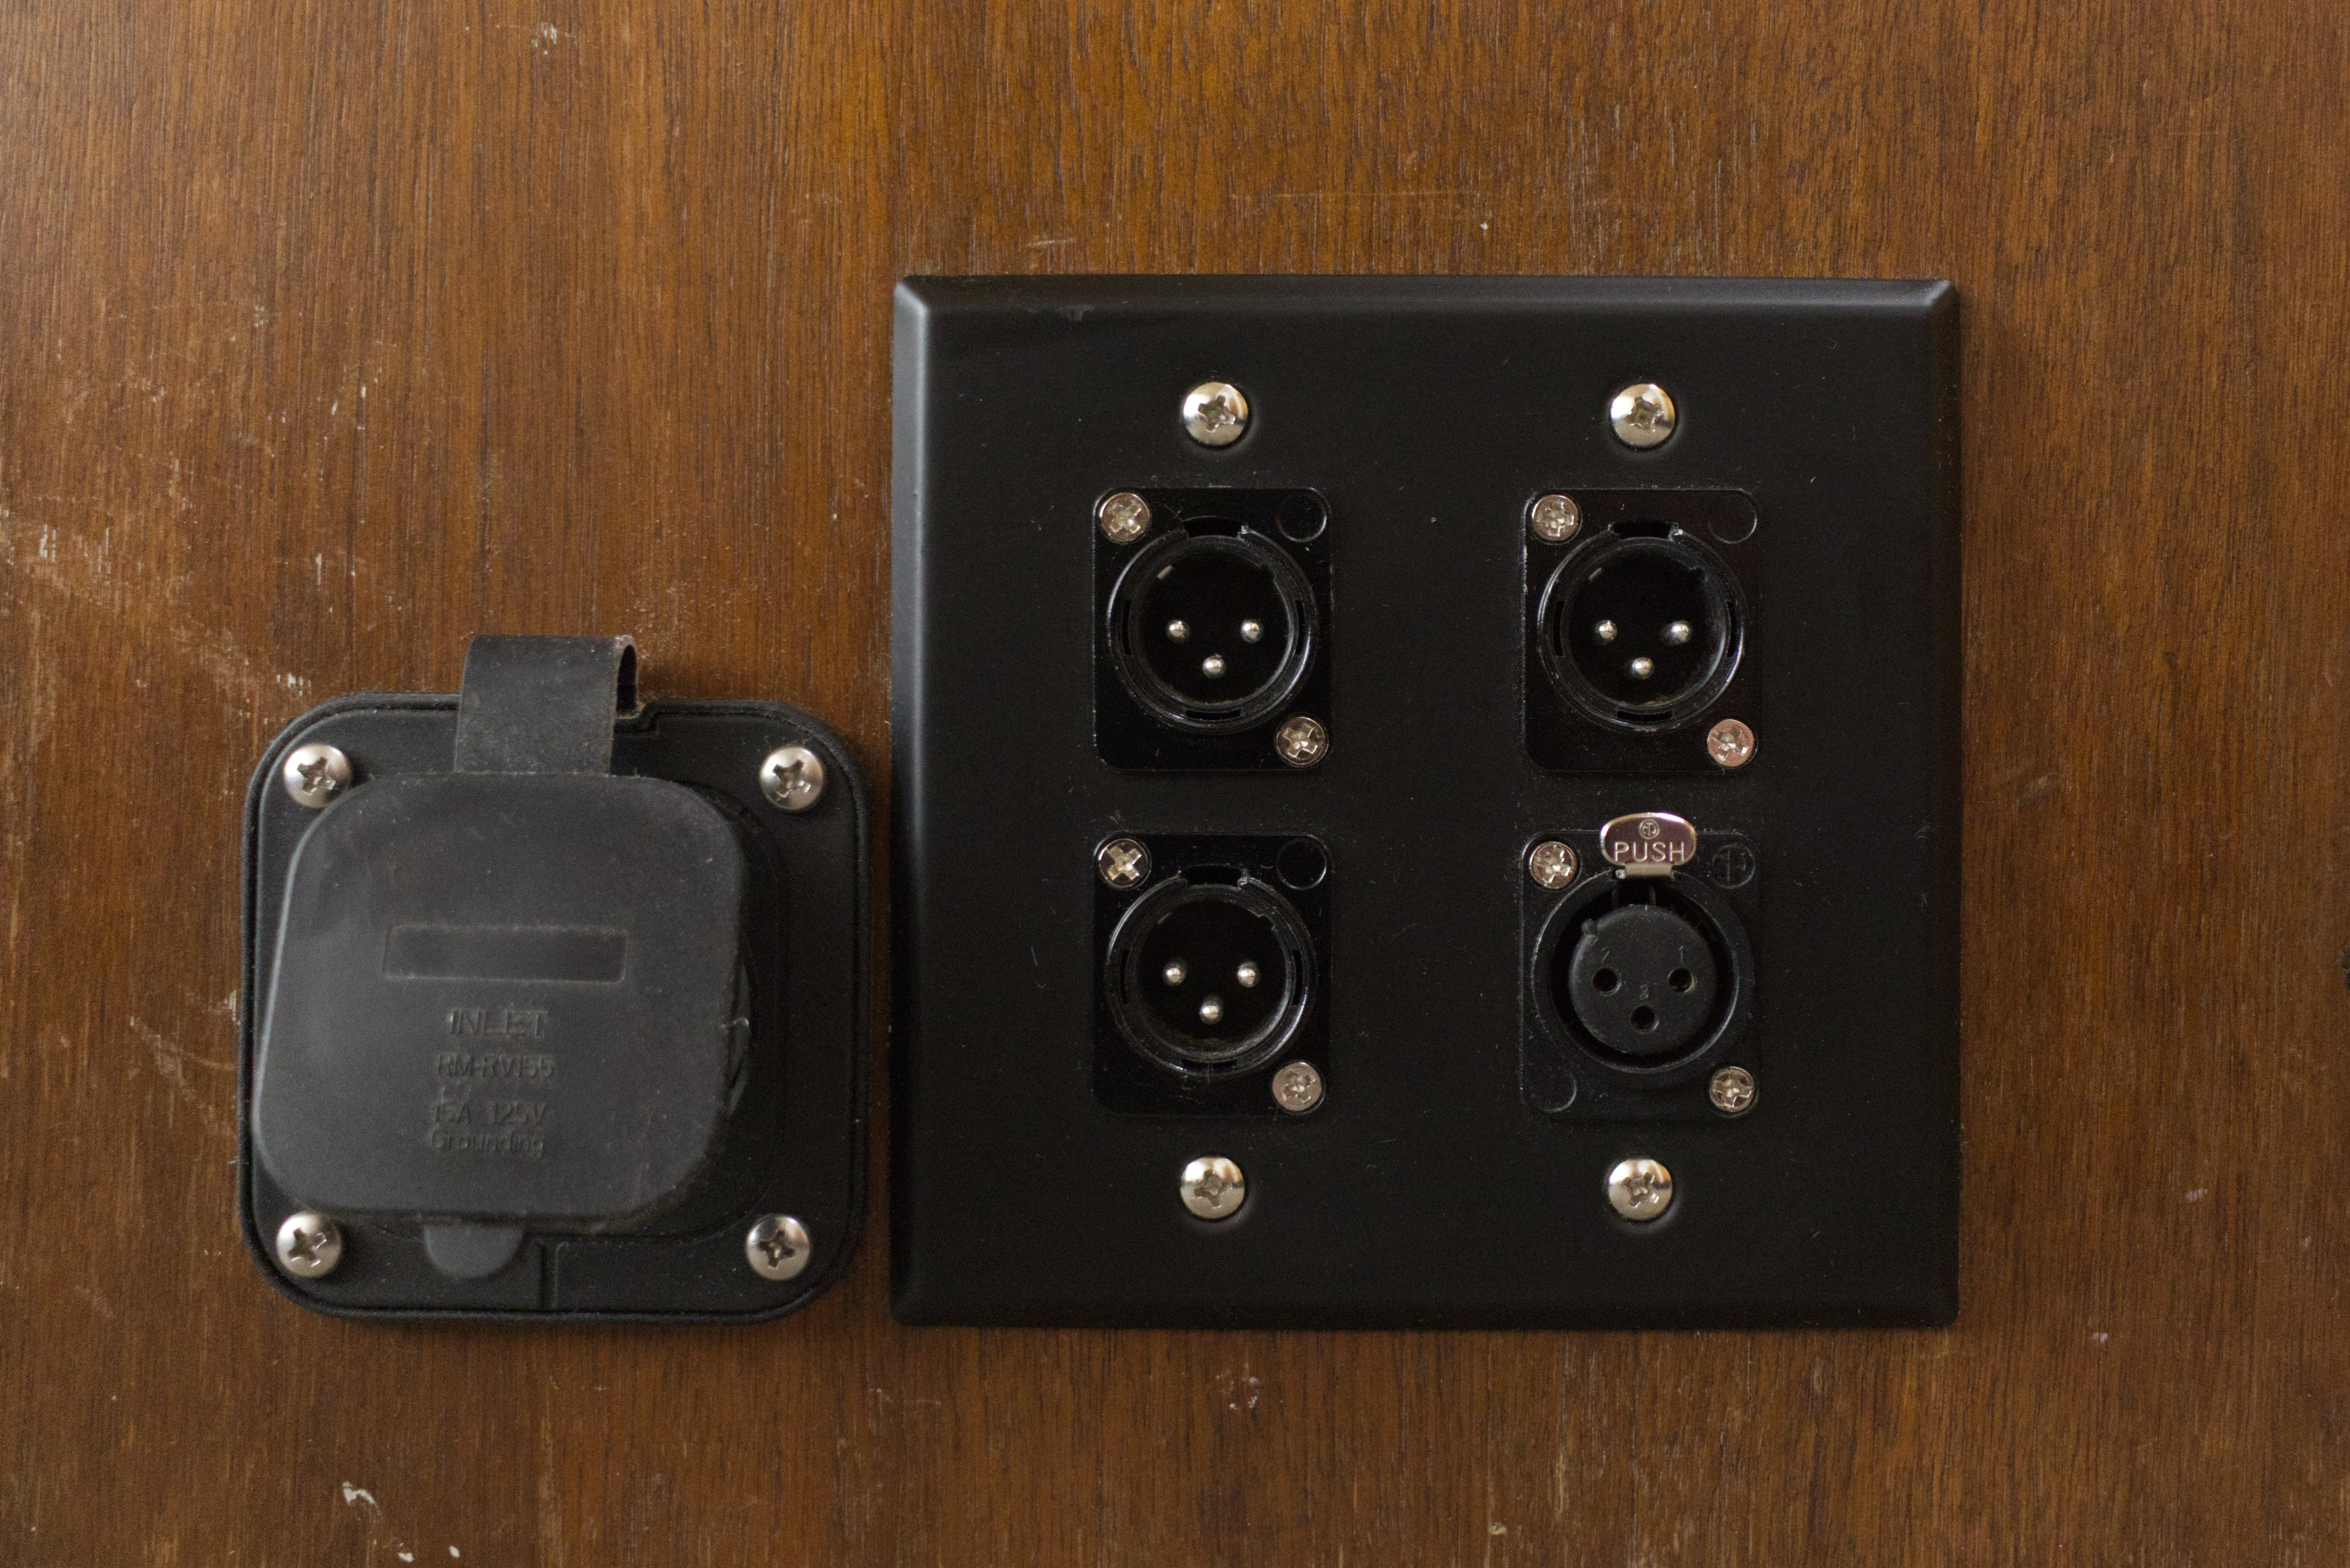
For the power I started with a RV power inlet. This is wired up to an electrical outlet that gets turned on and off from a power switch on the left hand side of the piano. There is a power strip that all of the various power bricks and cords are plugged into mounted on the wooden support bar inside the case. Under the lid of the piano I installed a warm white LED strip in an aluminum channel to light up the shelf inside the piano. I tried to clean everything up with a bunch of zip ties, keeping the power cables routed separately from the audio wires.
The audio portion is a little more involved. It starts with a 4 jack XLR plate. There is stereo audio outputs from the piano, a XLR in for a headphone amp to power in-ear monitors, and a DMX input to control the RGB strip and Edison bulbs on the back of the piano.
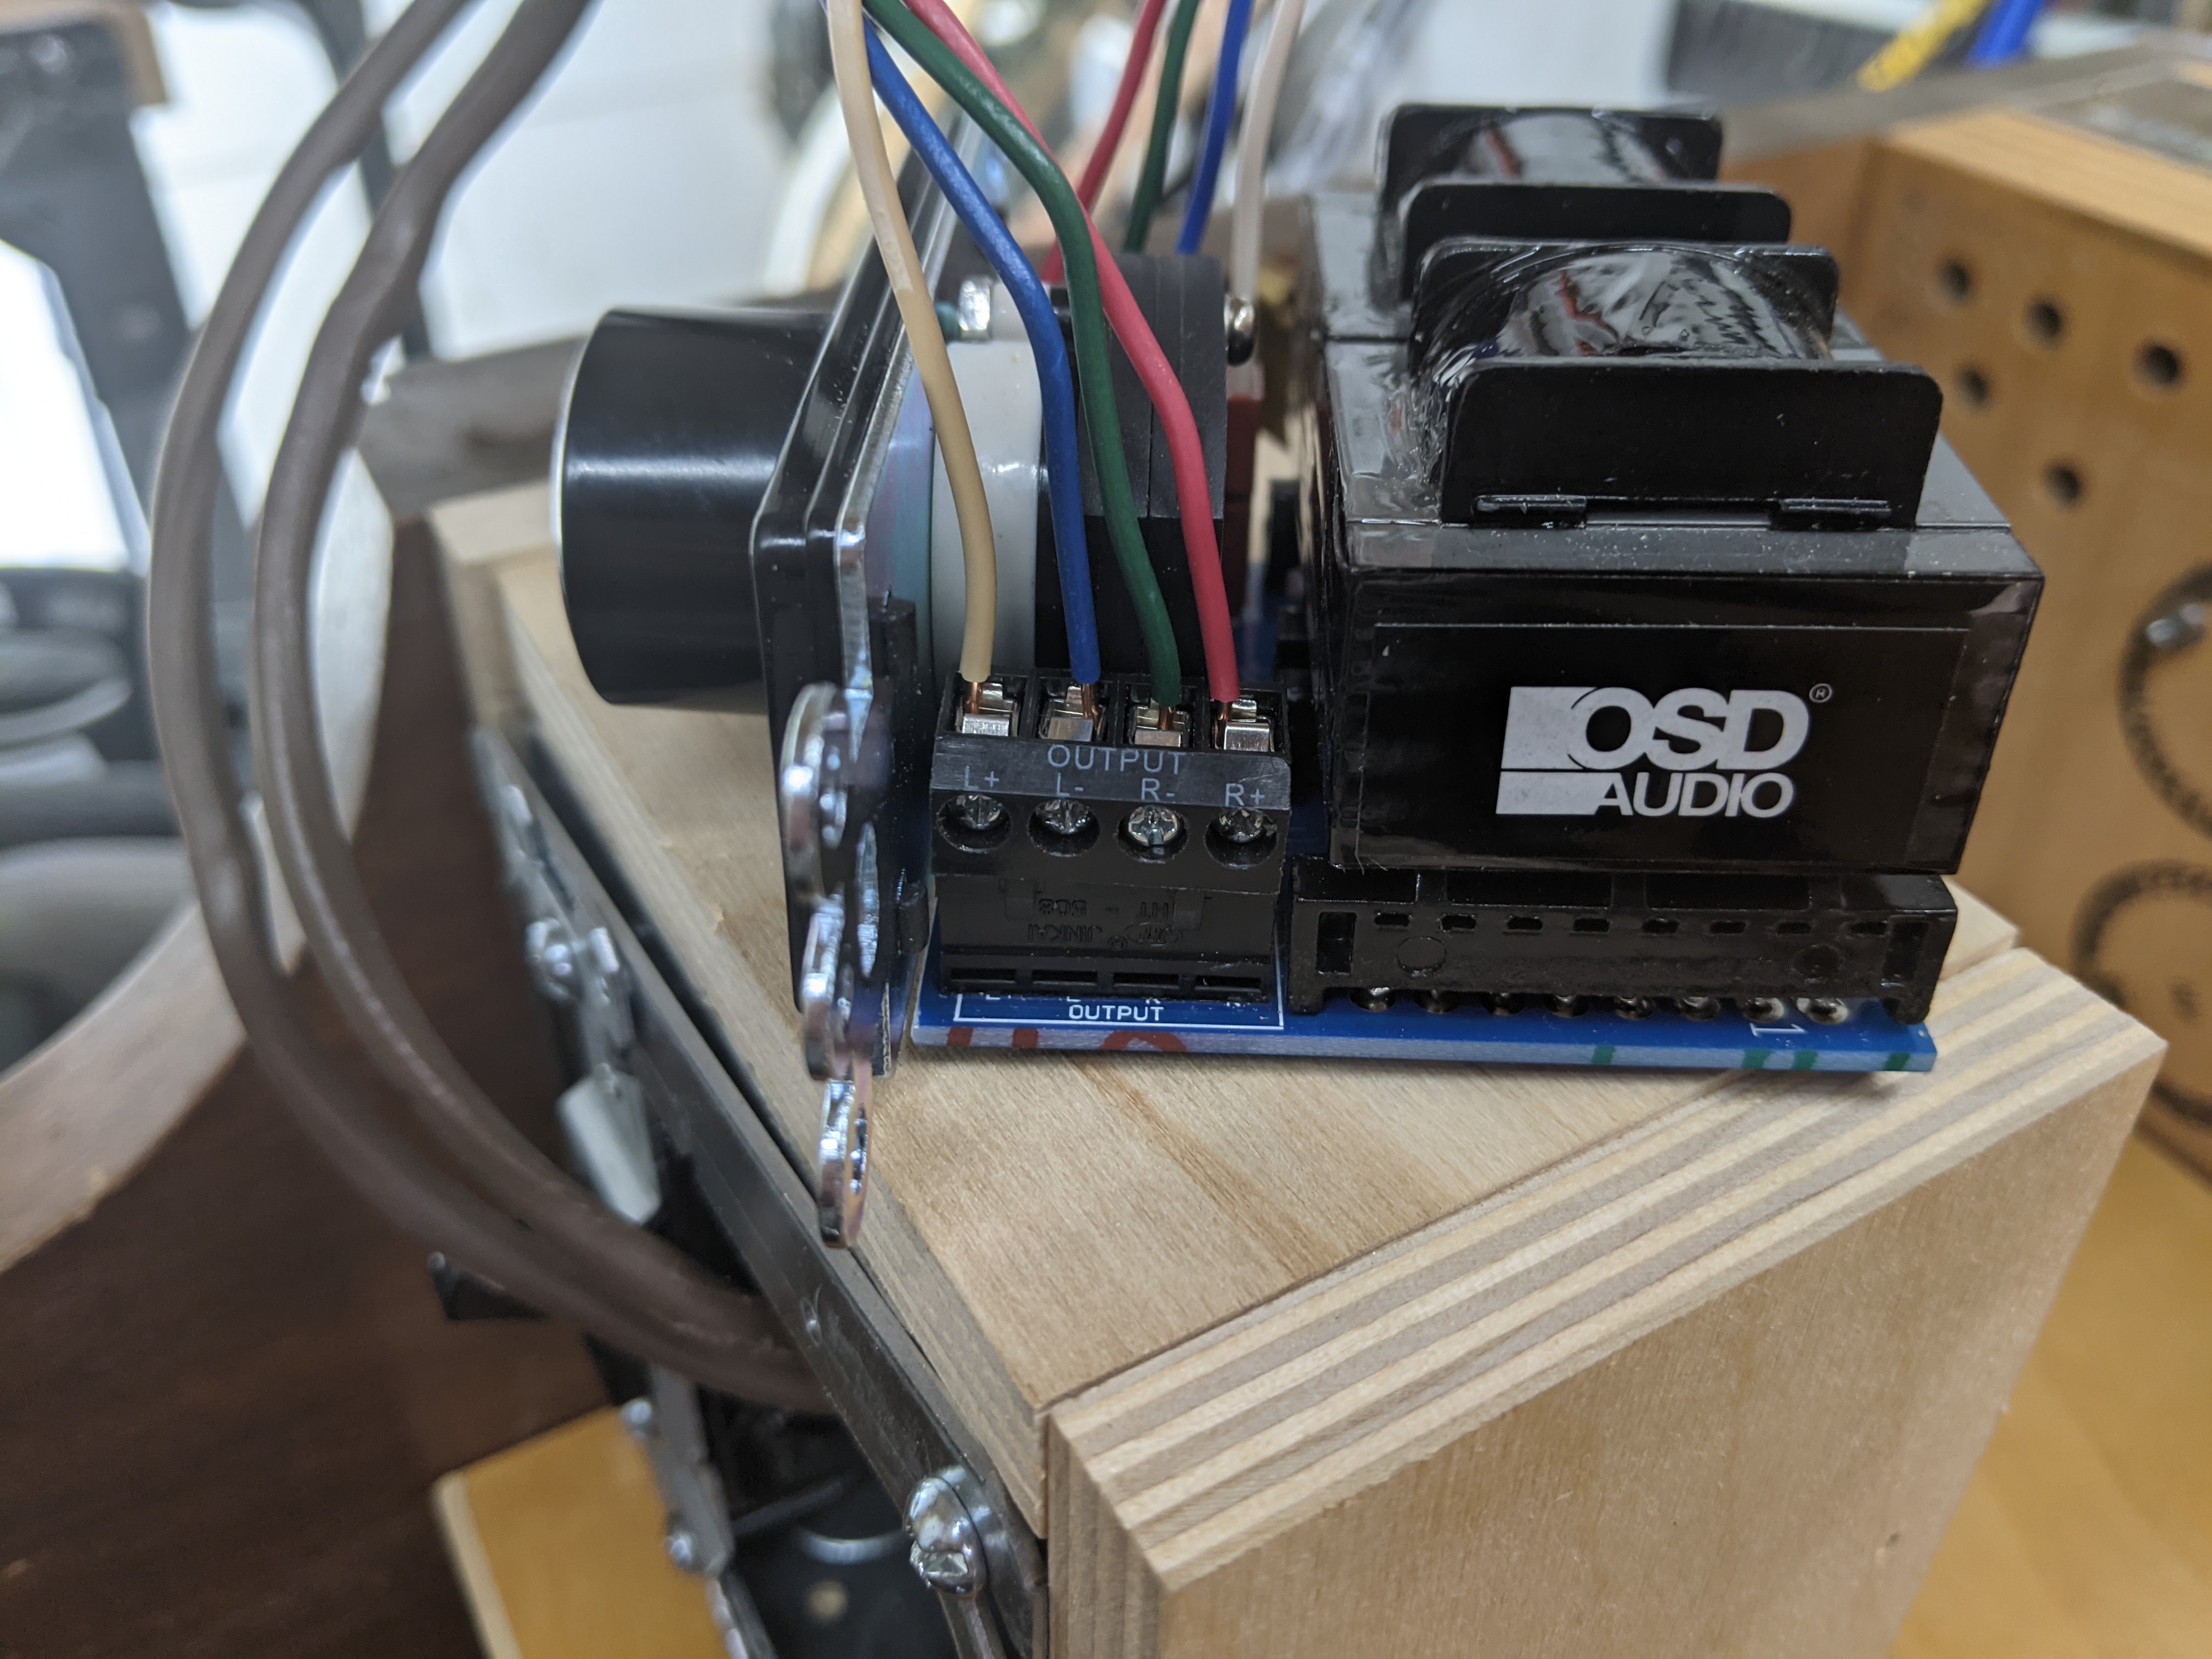
The XLR outputs hook up to a stereo Direct Box that is connected to the audio outputs of the piano. Later on I added a Rolls Mini Mix to blend the outputs from the piano and a computer. Then the thru output from the Direct Box feeds the input of the on board audio. For that I used a cheap 2.1 amplifier board. This worked pretty well but the loud line level output from the keyboard would clip the input of the board. I added a 10K potentiometer in front of the input of the board in order to bring the volume down so it would not clip. There is a pair of transducers wired up in series attached directly to the sound board of the piano. This combined with the home theater sub-woofer picked up from Goodwill give a really nice and balanced sound from the piano. If I were to do it again I would probably add more transducers or maybe go with a pair of actual mid range speakers and some more wattage all around. The piano isn’t as loud as a regular acoustic piano so although I am happy with how it sounds, it would be nice to have a little extra volume.


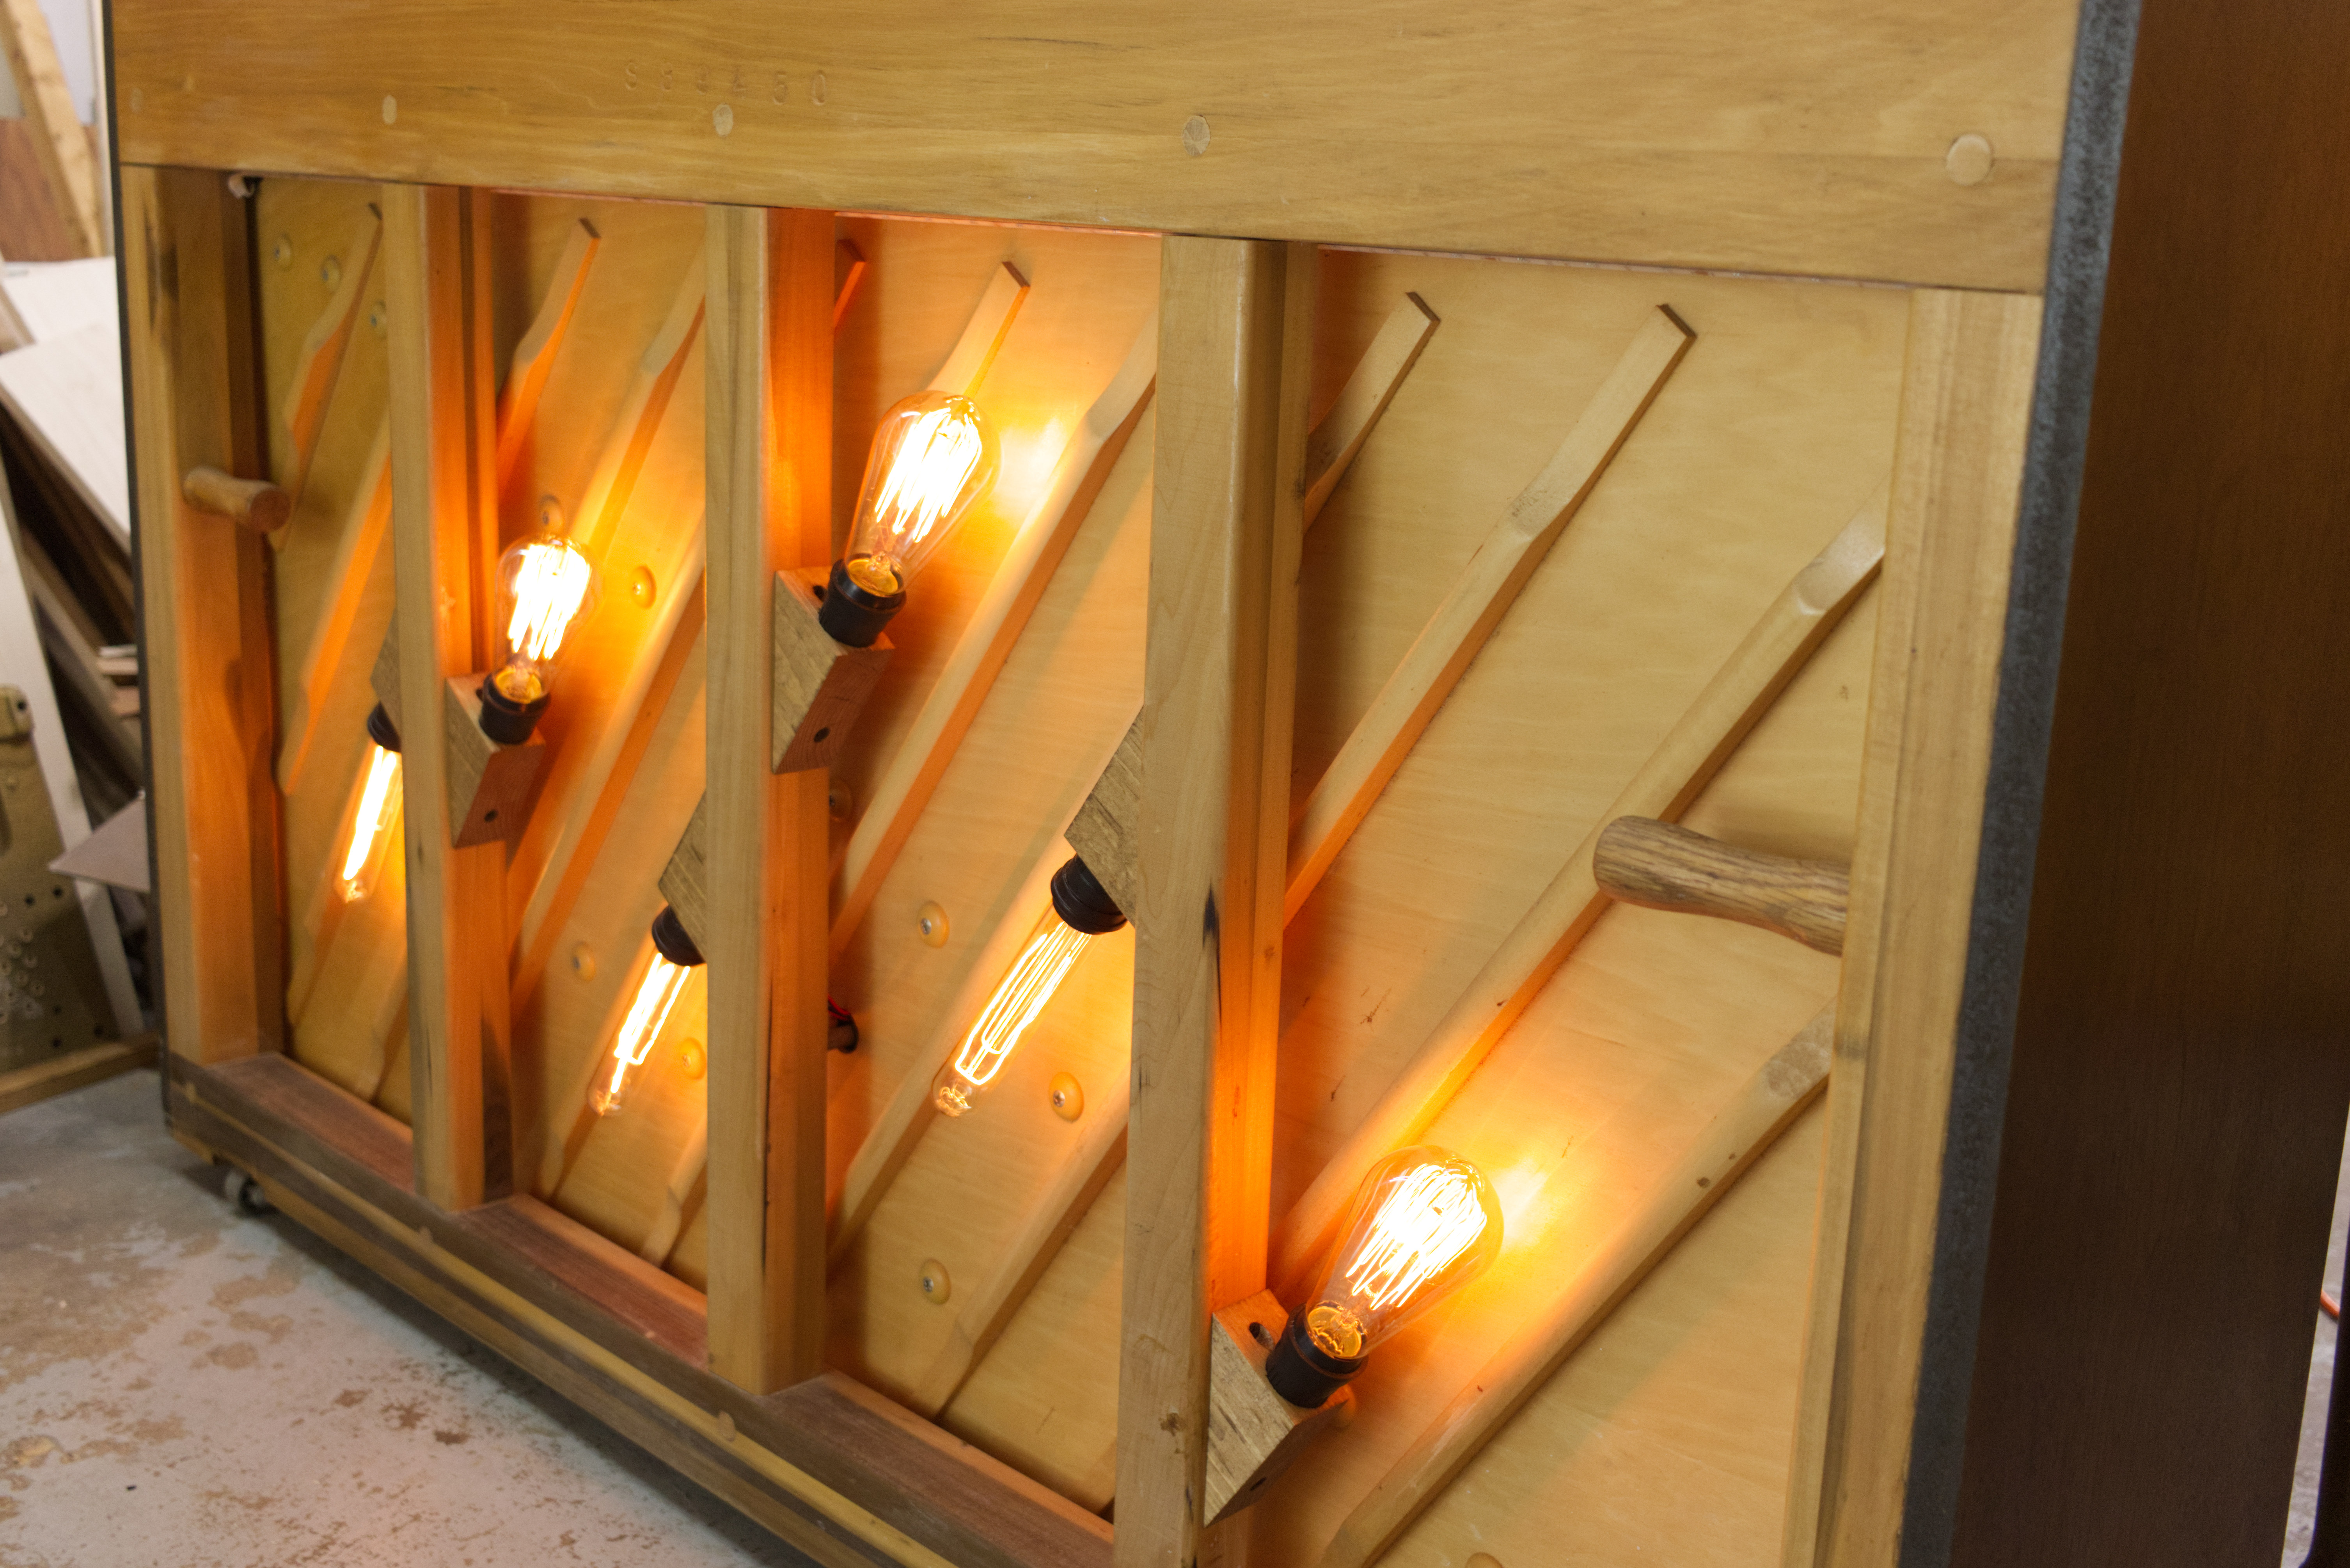
The DMX controlled lighting on the back of the piano was a really interesting problem. Sometimes you start down a path thinking it will be easier, but then you get so deep trying make it work. It becomes this addiction where the more time you invest, the more you feel is justified to invest since to give up would be to except defeat and make your efforts null.
I originally was going to try and control all of the lights from one, 4 channel, 12 volt DC led DMX controller. The key to this working was the 12 volt DC dim-able led Edison bulbs. that I found. Long story short, tried every possible way to get these bulbs to work, and while everything seemed promising at first, at certain levels of dim they would flicker and strobe in a horrible way. Finally I had to bail on the bulbs and go with normal 120 volt AC edison bulbs that had flawless dimming from 1% all the way to 100%. This meant that the piano has a dimmer pack for outlet dimming to drive the bulbs, and a separate dimmer for the led strip in the top.
One last interesting piece of wiring was to make use of the pianos original pedal to work with the sustain input on the keyboard. Sustain pedals for pianos simply work by connecting the tip to ground of a 1/4″ cable. So you basically just need a switch and a 1/4″ jack. My first attempt worked but the switch was just too loud. I knew the obknoxious clicking was really not something that you can deal with in a musical instrument. So instead of using a micro switch I built my own switch. I used an old 1/4″ cable I had and then used some electrical wire and a piece of copper tape to complete the circuit when the pedal is depressed. It is basically silent and works great. Since I removed all of the internals of the piano that would give resistance to the pedal I added a block of wood under the pedal lever with some felt I stole from the piano keys I removed. This gave the pedal a stop when depressed that made it feel more like a real piano.


Product Links:
Piano Audio Routing with Computer

This was a super fun project to put together. It was interesting to build something that I know primarily won’t be used by myself. So while it’s complicated on the inside, I tried to make it as user friendly on the outside. It looks great on stage, plays great, and it is really nice to basically sit down, plug in your computer and be off and running making music. I really do think pianos like this will be the future for people who want more sounds then just piano, but don’t want all the wire clutter of a keyboard visible and needing to be setup all the time.
This was one of those projects whose length made me go through a lot of emotions. First there was excitment at getting into the piano and starting, but then as the work and trouble shooting dragged on I was really burned out and just wanted it to be over. But then when the end was in sight, I was both ready for the project to be over and also thinking of things that I could do for version 2.0. I think it would be awesome to build basically a studio version that had a computer or synthesizer inside that boots up ready to go with the flip of a switch. Anything to take the hurdles and road blocks to making music out of the way. Anyways dreams of another piano conversion are only dreams at this point.

Leave a comment