
What to call this new guitar that I have created. It’s a full hollow body design, but shoved into a traditional thinline telecaster shape. It’s inspiration was to be a live guitar that could do everything reasonably well. Now that it is done, I would say somehow it does all that and more.
I had been looking into buying a Fender Acoustasonic guitar for a while now, but what always held me back was it seemed like something a little different then what I wanted of needed. If you want to play acoustic on one song and electric on the next then the solution is simple, bring two guitars. But what if you want to play acoustic guitar, maybe loop and rhythm part, and then add an electric guitar solo over the top? Or what if you wanted a song to start mellow with just acoustic guitar, but then fade in some ambient electric sounds later on in the same song? Up until building this guitar my solution was to play my Martin acoustic with a split going through my electric pedal board. While the acoustic sounded great, the electric guitar tone was rather wanting.
Design
I always found the design of the acoustasonic to be a little goofy looking. I guess you can look at it and know what it is, an acoustic telecaster. But I always thought that a better look would be the great design Fender already had in the Thinline Telecaster. Since I wasn’t sure how this project was going to work I didn’t want to waste more time then I had to in making the guitar in order to find out I tried to build an electric acoustic guitar that did neither very well. To expedite the process I purchased a walnut guitar blank off eBay and a Fender all parts neck from Reverb.com. I then purchased a bunch of subsequent parts and pieces from Stewart McDonald including the sitka spruce acoustic guitar top blank for the top of my Telecaster.
Build
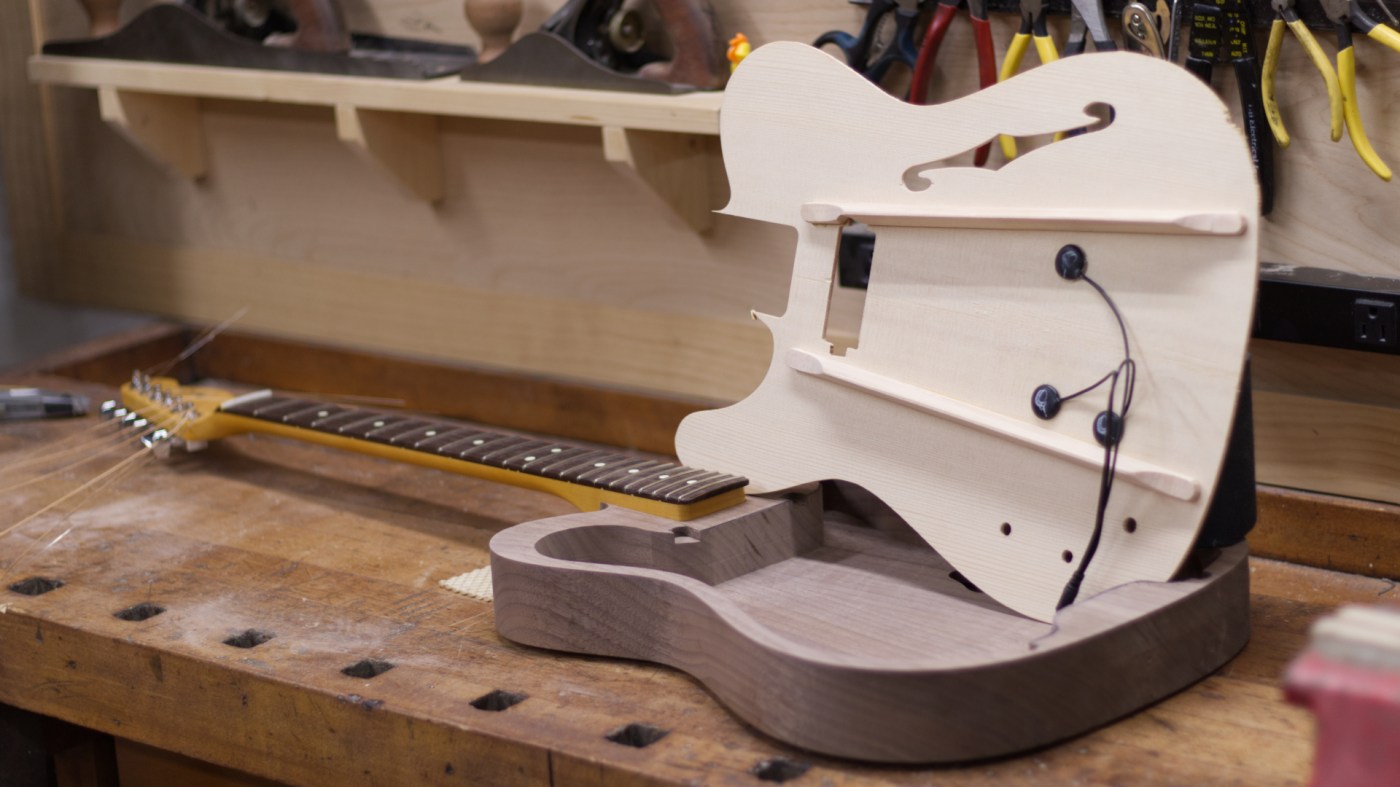
I started by using some MDF Thinline Telecaster templates and a pattern bit in the trim router to mill down the walnut blank into a telecaster shaped hollow bowl. Since I wanted a trapeze tailpiece and floating bridge setup I needed extra height between the strings and the top of the guitar body. This meant instead of the neck pocket being flat I routed it out at around three degrees. This was tricky to think about and I used wood shims to angle my template but it all ended up fitting well in the end.
Once the neck pocket was cut with the three degree angle I could begin preparing the Sitka spruce blank. This really only involved planing and glueing the two halves together and then cutting the top to shape with the bandsaw and a trim router. I then prepared two spruce braces to support the top. These are setup in a parallel brace style similar to a hollow body archtop guitar however they are not technically parallel. They support from outside the neck pocket to the back of the guitar. There position is under both sides of the floating bridge so the force of the bridge should transfer right into the bracing and not strain the top.
In hind sight the one thing I would do differently on this guitar is add an extra brace perpendicular to these that could support the top behind the cutout for the magnetic pickup. This area was to weak and I experienced a crack in the top along the grain where the pickup hole is located.
At this point I had enough done to see if the guitar was going to work at all. I could bolt the neck on, screw the trapeze tailpiece on and use the string tension on the bridge to hold the top and bracing all together. This test was super exciting. The guitar sounded great acoustically. The action and over all playing feel was excellent and I was hopefully that the whole project was going to work out to being a really nice guitar.
I paused at this point in order to wind my own magnetic pickup for the guitar. I simply used a Stewart McDonald mini humbucker kit to make my own pickup. I wanted to try out the combination of the magnetic pickup as well as the placement of the piezo elements to make sure I was happy with the sound of everything. Once I got that dialed in it was time to press on with the guitar build.
first thing was gluing the top to the bracing, then the top and bracing to the walnut bottom. Then lots of sanding and routing to fit walnut edge banding to the guitar. I think the finished appearance of the guitar is amazing but the edge banding was a real nightmare. It was a very long night of burning my fingers but finally with enought masking tape the purling and edge banding was in place and looked amazing.
Last was more sanding and then finishing the guitar with shellac via a french polish. I didn’t feel like messing around with a spray booth and lacquer and all of that so I tried something I never have. I won’t go into too many details about the french polish but the process was relatively easy albeit repetitive. I am happy with the final look of the guitar but I am curious to see how it will hold up to normal abuse over the years.
Electronics
For the electronics I paired the custom wound mini humbucker with the journey instruments passive piezo acoustic pickup (EP001K). Those feed into the Fishman powerchip preamp which is powered by the Fishman universal rechargeable battery.
With that all that was left to do was bolt together all of the hardware and string it up.
Watch the relaxing build video below and hear the guitar being played. All music recorded straight from the pickups through my pedal board and into the computer. So what you hear is basically the live sound of the guitar.
Product Links
Journey Instruments Piezo Pickup: https://amzn.to/4242sZw
Fishman Powerchip: https://amzn.to/3qfd1ve
Fishman Battery: https://amzn.to/428haP3
Cavity Template: https://amzn.to/45qk0Sh
Template Router Bit: https://amzn.to/3qahOyl
Router Bit Guide Set: https://amzn.to/3WvfWfw
Pattern Bit 1/2″: https://amzn.to/41ZkTOQ

Leave a comment