

So maybe like me and have some sleeping babies at home, or maybe the sweet spot for tone on your amp is blisteringly loud, so in order to tame the volume on a tube amp an attenuator is what you need.
If you didn’t know an attenuator goes between your guitar amp and speaker and allows you turn down the volume of your amp, while still getting all the preamp and power amp tone from your amp. Now obviously there are a bunch of attenuators that you can buy, but it really isn’t too hard to build your own.
Help Support This Content!
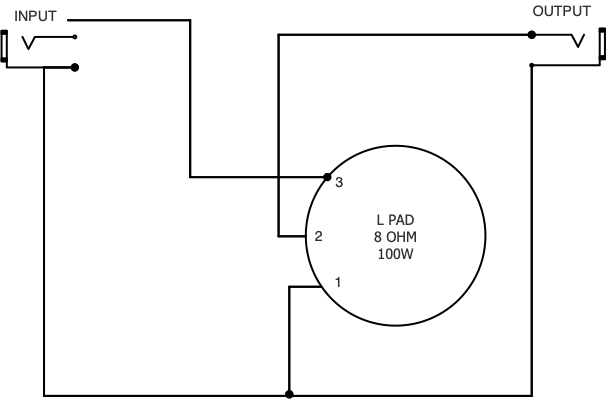
Basically this little box converts the power of your amp from volume to heat. The main thing that does that is this giant potentiometer called an L-Pad. This is 8 ohms and 100 watts. So if you have an 8 ohm output amplifier you basically just need to stuff this in a box with an input and output jack and you are all done. In fact the wiring is literally printed on the side of the box.
I want to also use this attenuator box with my silver tone twin twelve over there, so I am also going to add this 50 watt, 8 ohm resistor inside so that I can switch this box between 4 and 8 ohm.
Below are the schematics for the attenuator with and without the 4/8 ohm selector switch.

So to get started we need this L-Pad, 2 1/4 inch jacks, and some wire. If you want to build the switch to change between 4 and 8 ohms then you also need this 8 ohm, 50 watt resistor, and a switch.
Materials:
We need an enclosure to put everything in. Now you could buy a guitar pedal style enclosure for this, and that would work perfectly, but I actually dug around in my basement and found this old data transfer switch, and this little box should be perfect to re-purpose for this.
So to get started I laid out my components where I wanted them. I really wanted to use the existing holes in the enclosure since they were basically perfect. On the back I can replace the three what I think are PS2 ports with the input / output jacks as well as the 4/8 ohm switch. Then on the front where the selector switch was I can put the L-Pad. Now this just barely didn’t fit, but I could take the metal cover off the back, and then ever so slightly sand down the plastic housing on the disc sander and then everything fit perfectly.
The first thing that I did was layout where the extra orange resistor needed to go on the the bottom middle of the box, then I could drill the two mounting holes and cut threads in them with a tap. Then I could put some thermal compound on the resistor to help it stay cool and screw it down to the bottom of the enclosure.
Since all of the components just push through the holes from the inside and then get tightened down with nuts from the outside I could go ahead and basically solder everything up outside the enclosure and then install the whole thing once it was done, with the exception of the orange resistor.
Now meticulous wire management is not something that I can be bothered to do. Even considering that all of you will forever see my rats nest I just don’t think it is worth the effort, rest assured however that the wiring is correct and that the solder joints are solid.

So with everything soldered up I could install it all in the bottom half of the case and try it out.
Disclaimer
If you don’t do this right you can cause damage to your amplifier. I take no responsibility for that. I recommend that you double triple check everything before plugging it in. I made sure to check the input by measuring the resistance from positive to negative on the input jack. That read 4 and 8 ohm correctly depending on which way the switch is set. Which I then made sure to label with a sharpie.
Disclaimer 2:
This is an attenuator and not a load box. It is designed to work with a speaker still attached to the amplifier. As you turn up the attenuator you are connecting more of the amp to the speaker, so no speaker means you are running the amp with no load. Don’t do that…
Next I plugged in a cheap, solid state Marshall practice amp that I have, since it would mean the least to me if something happened to it. Everything was fine so I tried it on a little crate tube amp, and that worked fine too. So now I was confident that I could plug it into my bigger tube amps without a problem.
Now at this point the attenuator is done, but it would be a bad idea to seal everything up inside this enclosure. If you remember earlier I said that this box works by converting the power of the amp from volume into heat. So naturally this little box is going to get warm. Now if that heat has nowhere to go then it is going to get really warm, which is bad. So we need to drill some holes in the box to let the heat out.
Now I printed out a pattern of dots that resembles a spectrum analyzer and basically my little logo thing. And I could take this to the garage and first use an auto punch to mark the holes, then come back with an awl and mark the holes deeper, and then use a step bit in my drill to drill out a whole bunch of holes.
Now this was the worst part of this project and I think took longer then actually building the thing. Now it was my intention to drill out every hole but I liked the look of these partially drilled holes. Maybe chalk it up to laziness but I decided to leave the top rows only partially drilled to give this sort of two tone effect. I don’t know for sure if the amount of holes That I drilled is sufficient to keep everything cool, But I will just keep an eye on it and if it gets too hot, then I can always drill more holes if I need to.
All in all this is a great little project to build and comes in handy for taming all sorts of tube amps. Watch the video below to see the build process:

Thank you! I just built mine.
How do you know if you built it wrong? Is it pretty obvious?
Thanks
LikeLike
I’m thrilled to find this project.
I’ll be building one 16/8 ohm as this best fits my situation.
It’ll be good to be able to plug into the big iron without the law coming down on me.
LikeLike